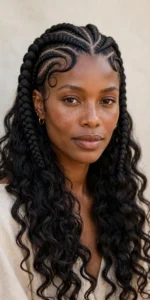



Goddess braids are large, sculpted feed-in cornrows with curved partings and loose, flowing curls left at the ends — a regal protective style that looks polished from every angle. If you only try three, start with Goddess Braids with Curly Ends, Classic Straight-Back Goddess Braids, and the Goddess Braids Bun: they suit almost everyone and show off exactly what makes this style special.
What Are Goddess Braids?
Goddess braids are chunky feed-in cornrows braided close to the scalp, usually with curved or sculpted partings, and finished with soft curls instead of sealed ends. The braider feeds in extension hair gradually, so each cornrow starts slim at the hairline and grows fuller — that is what gives the style its smooth, raised, almost sculpted look. It is a protective style rooted in African braiding tradition, and braiding has carried cultural meaning for centuries, long before it became a salon trend.
They are not the same as boho braids, which are knotless box braids with curly pieces left out all through the lengths, or box braids, which are built on uniform square sections hanging straight down. Goddess braids sit flat against the head like cornrows, so they feel lighter, show off parting designs, and work beautifully pulled into buns and updos. If you love the look of cornrows but want something softer and more dressed-up, this is the style to ask for.
How Long Do Goddess Braids Last?
With decent care, goddess braids last four to six weeks. The curls at the ends usually frizz first, so most people refresh those with a quick re-curl or trim rather than taking the whole style down. Expect the install to take three to five hours — jumbo styles can be done in under three, while mini or waist-length versions can stretch past five. Salon prices vary a lot by length, size and location, but a realistic range is roughly $120 to $300, with longer or more intricate designs sitting at the top end. Bring reference photos and agree the price before your braider starts.
32 Goddess Braids Styles to Show Your Braider
1. Classic Straight-Back Goddess Braids
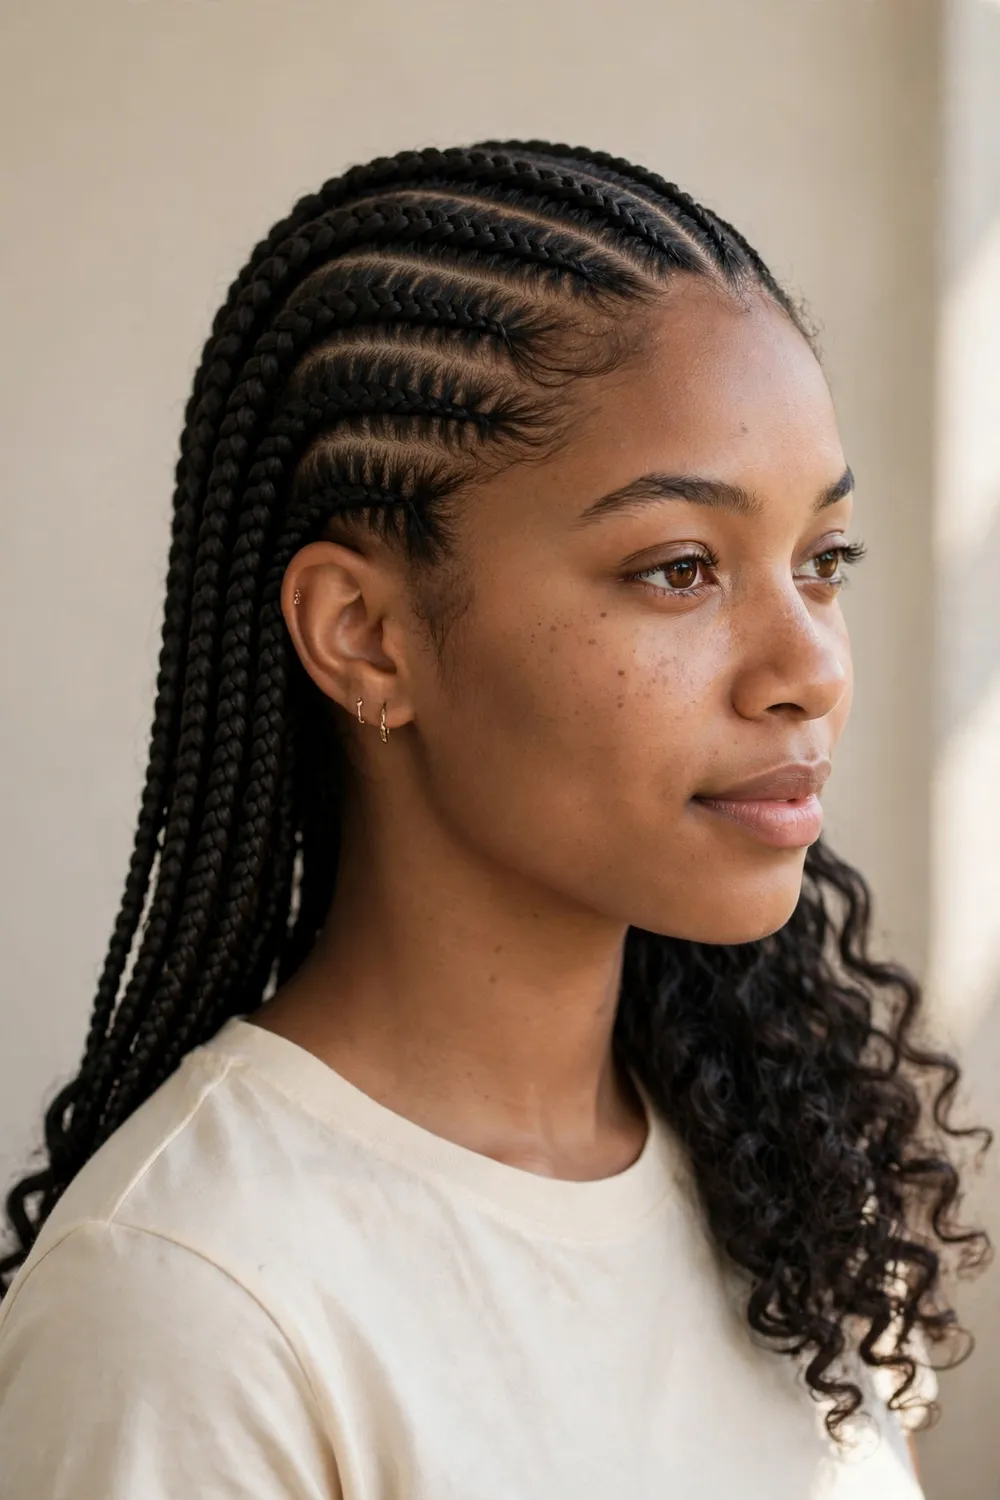
This is the original goddess braid look and still the one most braiders do best: neat feed-in cornrows running straight from the hairline to the nape, finished with soft curls. It suits oval and round faces particularly well because the straight lines lengthen the face, and it works on most hair lengths. Ask your braider for six to eight medium cornrows, straight-back partings, with the last few inches left out and curled. A light mousse or foam wrap sets the curls without stiffness, and a shine spray keeps the parts looking clean. Maintenance is easy: tie it down with a silk scarf at night and oil your scalp twice a week. Expect some new growth showing at the edges by week three, which is normal.
2. Curved Goddess Braids with Loose Curls
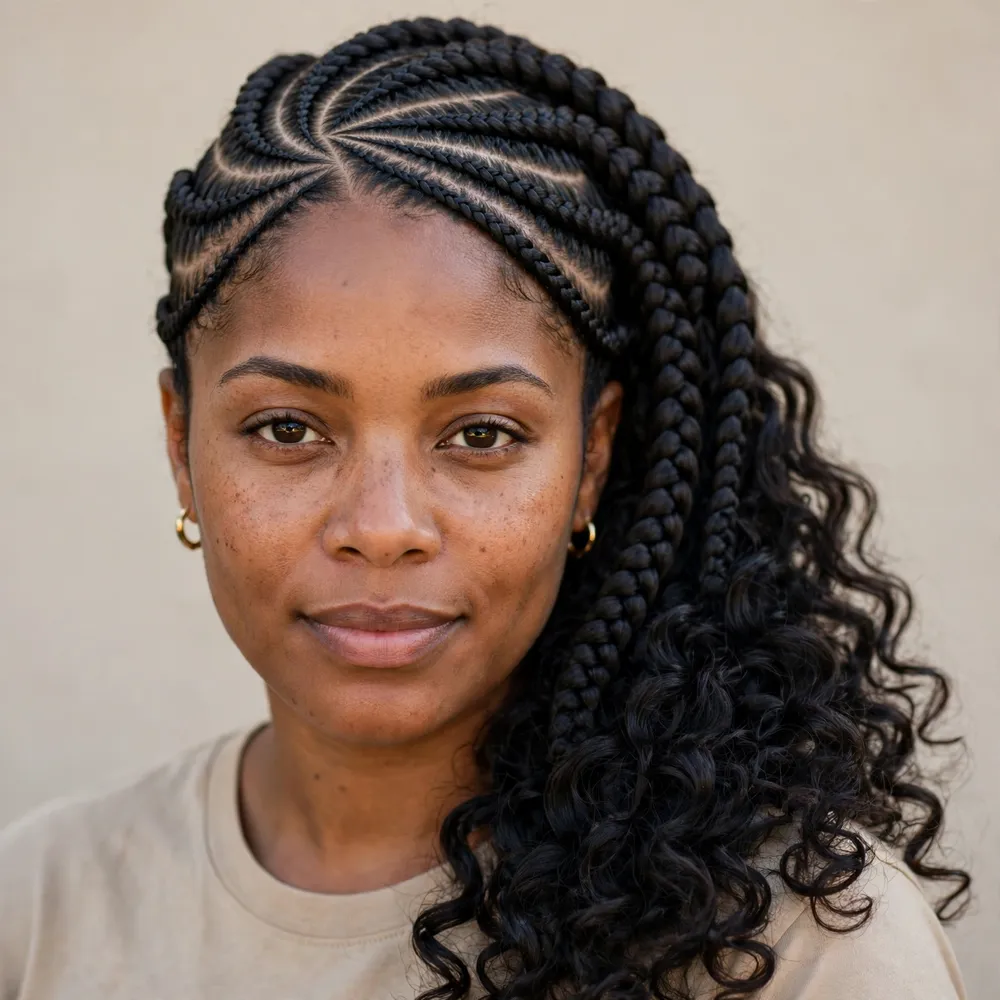
Curved partings turn a simple cornrow style into something sculptural. Instead of straight lines, the braids sweep in gentle S-curves across the scalp, then fall into loose, flowing curls past the shoulders. It flatters square and heart-shaped faces because the curves soften strong angles, and it photographs beautifully from the side. Ask for curved partings with medium cornrows and curls left loose, not tightly defined — you want movement, not ringlets. Your braider will likely use a curling wand or flexi rods on the ends, sealed with a little mousse. The curls need a nightly pineapple wrap or loose bonnet, and a light leave-in spray keeps them from going frizzy. Plan on re-curling the ends once a week to keep the shape.
3. Side-Swept Goddess Braids
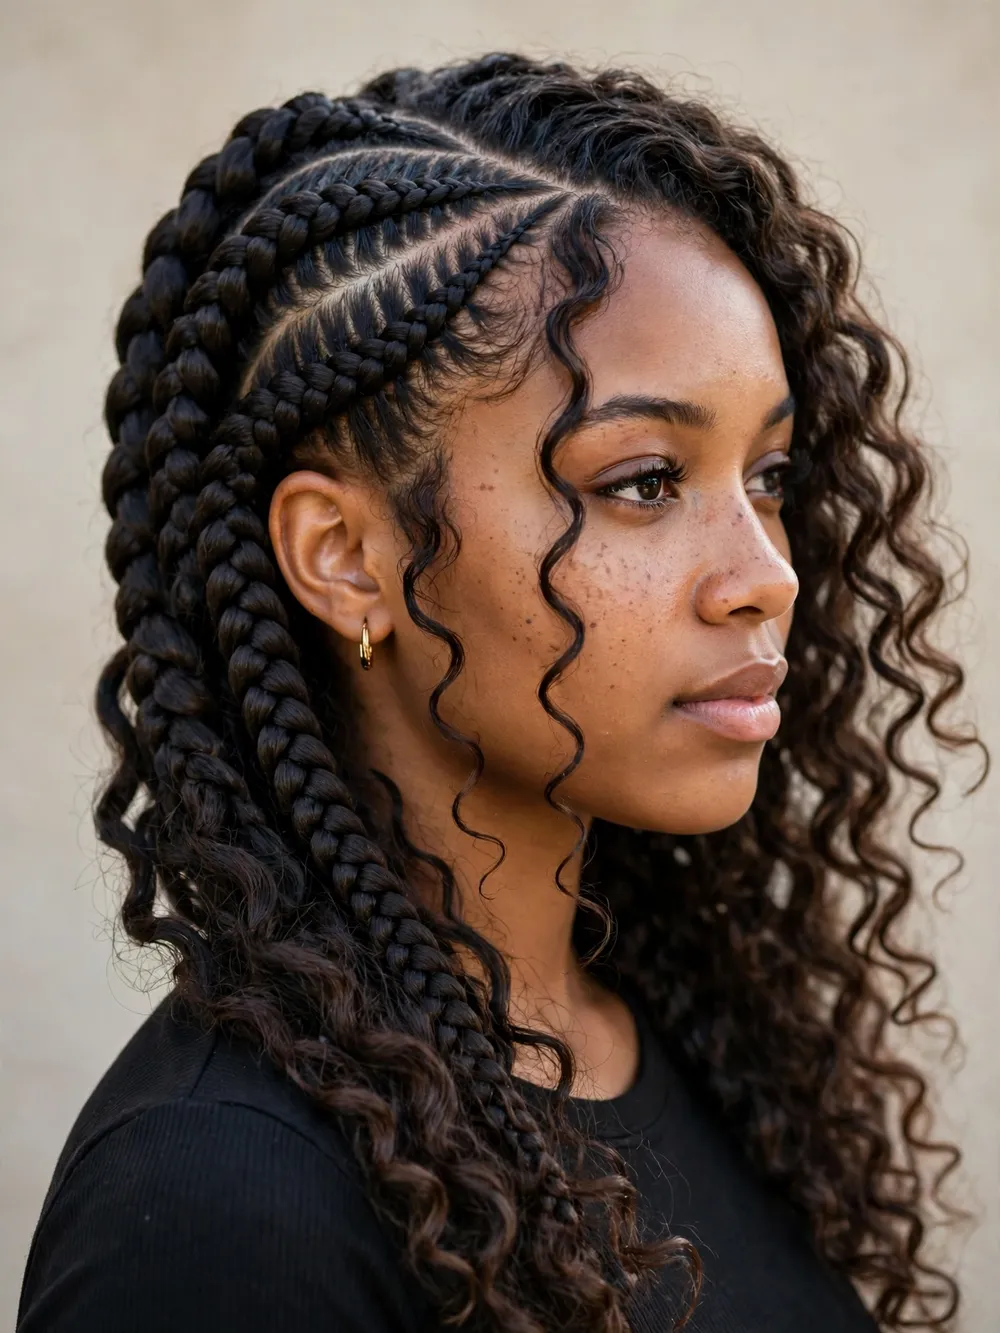
Everything about this style leans to one side, which gives it instant drama. The cornrows start at one temple and sweep diagonally across the head, ending in curls that fall over one shoulder. It is a brilliant choice for a wedding guest look or a night out, and it suits anyone who likes an asymmetric finish. Ask your braider for diagonal partings sweeping to your preferred side, with the curls concentrated on that side too. A side part suits this style better than a centre one. Finish with a light-hold spray and a shine serum on the braids. Sleeping on the swept side can flatten the curls, so pin them loosely up at night and shake them out in the morning.
4. Goddess Braids Bun

When the braids go up into a high bun, the whole style turns regal. The cornrows are braided toward the crown, then wrapped and pinned into a full, rounded bun that sits like a crown on top of the head. It suits long faces and anyone who wants their hair completely off their neck in warm weather, and it is a natural pick for formal occasions. Ask for the braids to be directed upward into a high bun, with the curly ends tucked and pinned rather than cut away. Your braider may use a small hair donut underneath for extra fullness. Edge control keeps the hairline sleek. A bun this high can pull if it is pinned too tight, so tell your braider the moment it feels uncomfortable.
5. Goddess Braids with Beads

Beads add movement, colour and personality to goddess braids without changing the braid pattern itself. Wooden beads give a warm, earthy feel; metallic gold or silver beads lean more glamorous, and a mix of both works for festivals and holidays. This style suits anyone who wants their braids to make noise — literally, beads click softly when you move. Ask your braider to thread beads onto the last few inches of selected braids, not every single one, so the weight stays comfortable. A small elastic or a knot holds each bead in place. Beads can snag on scarves and pillowcases, so a satin bonnet is essential at night, and remove them carefully at takedown rather than pulling them through the curls. They are easy to reuse on your next install.
6. Heart-Shaped Goddess Braids
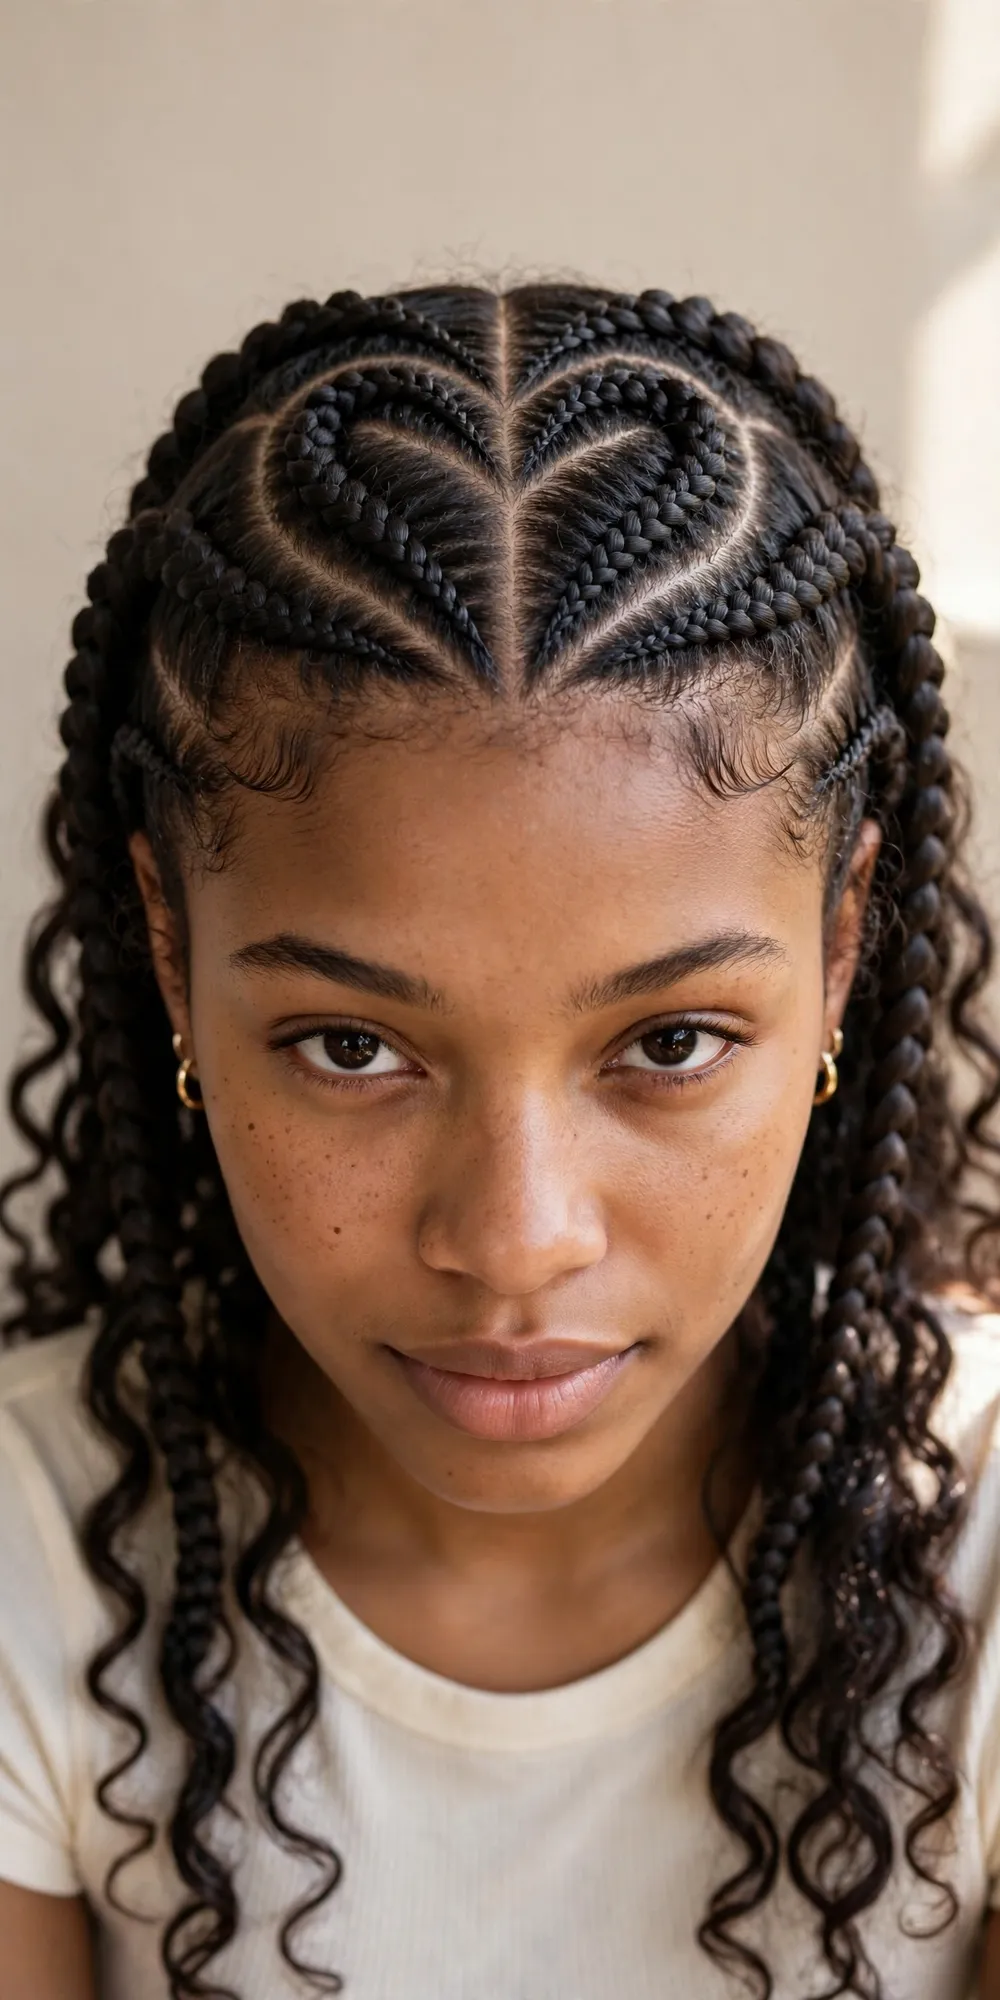
A heart parted into the crown is the kind of detail people notice from across the room. The braider maps a heart shape at the top of the head, then builds the surrounding cornrows around it so the motif stays crisp. It is a statement style, best saved for occasions when you want the back of your head to be the talking point — birthdays, photoshoots, Valentine’s season. Ask specifically for a heart-shaped parting with clean, curved cornrows flowing out from it, and check the design in a hand mirror first. The parting needs to stay sharp, so keep products away from the scalp lines and avoid scratching. This one takes longer than a straight-back install, so budget an extra hour and expect the price to reflect the detail.
7. Long Goddess Braids to the Waist
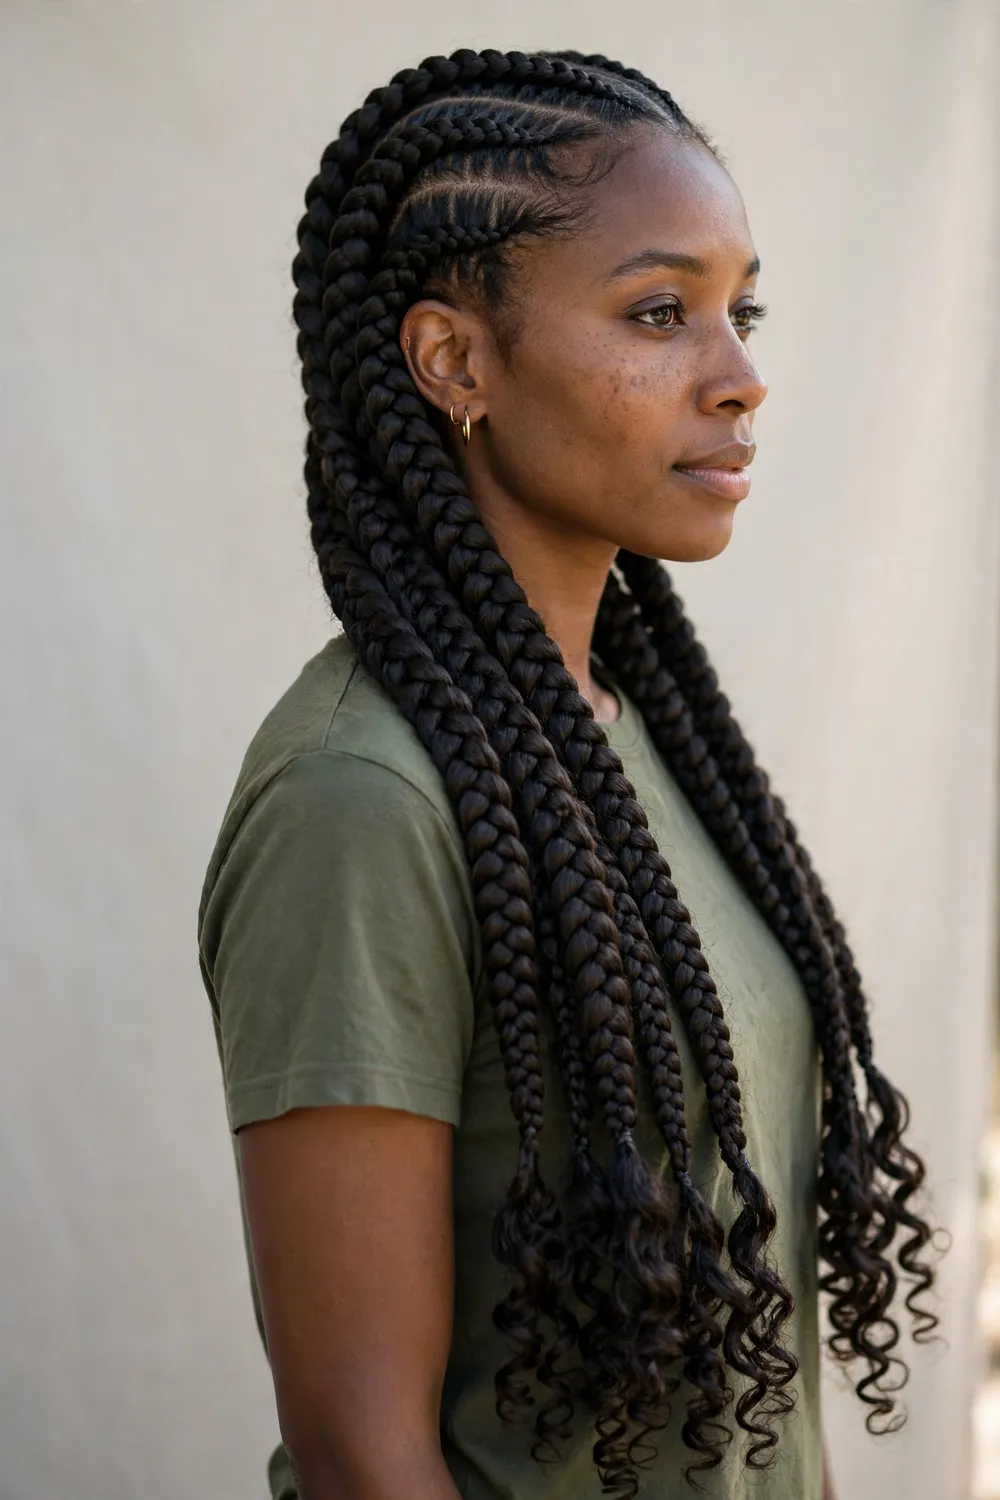
Waist-length goddess braids are pure drama: long feed-in cornrows that keep going until they brush your waist, finished with curls that move when you walk. They suit tall frames and anyone who loves long hair but wants it protected and low-maintenance for weeks. Ask for extra-length braiding hair — usually two to three packs — and agree the finished length before your braider starts cutting. The weight is real, so keep the cornrows medium rather than jumbo to spread it evenly, and tell your braider if your neck starts aching. A light mousse keeps the curls defined, and braiding the lengths loosely at night stops tangling. This is the most expensive and longest install in the list, so plan for five-plus hours.
8. Goddess Braids with Curly Ends
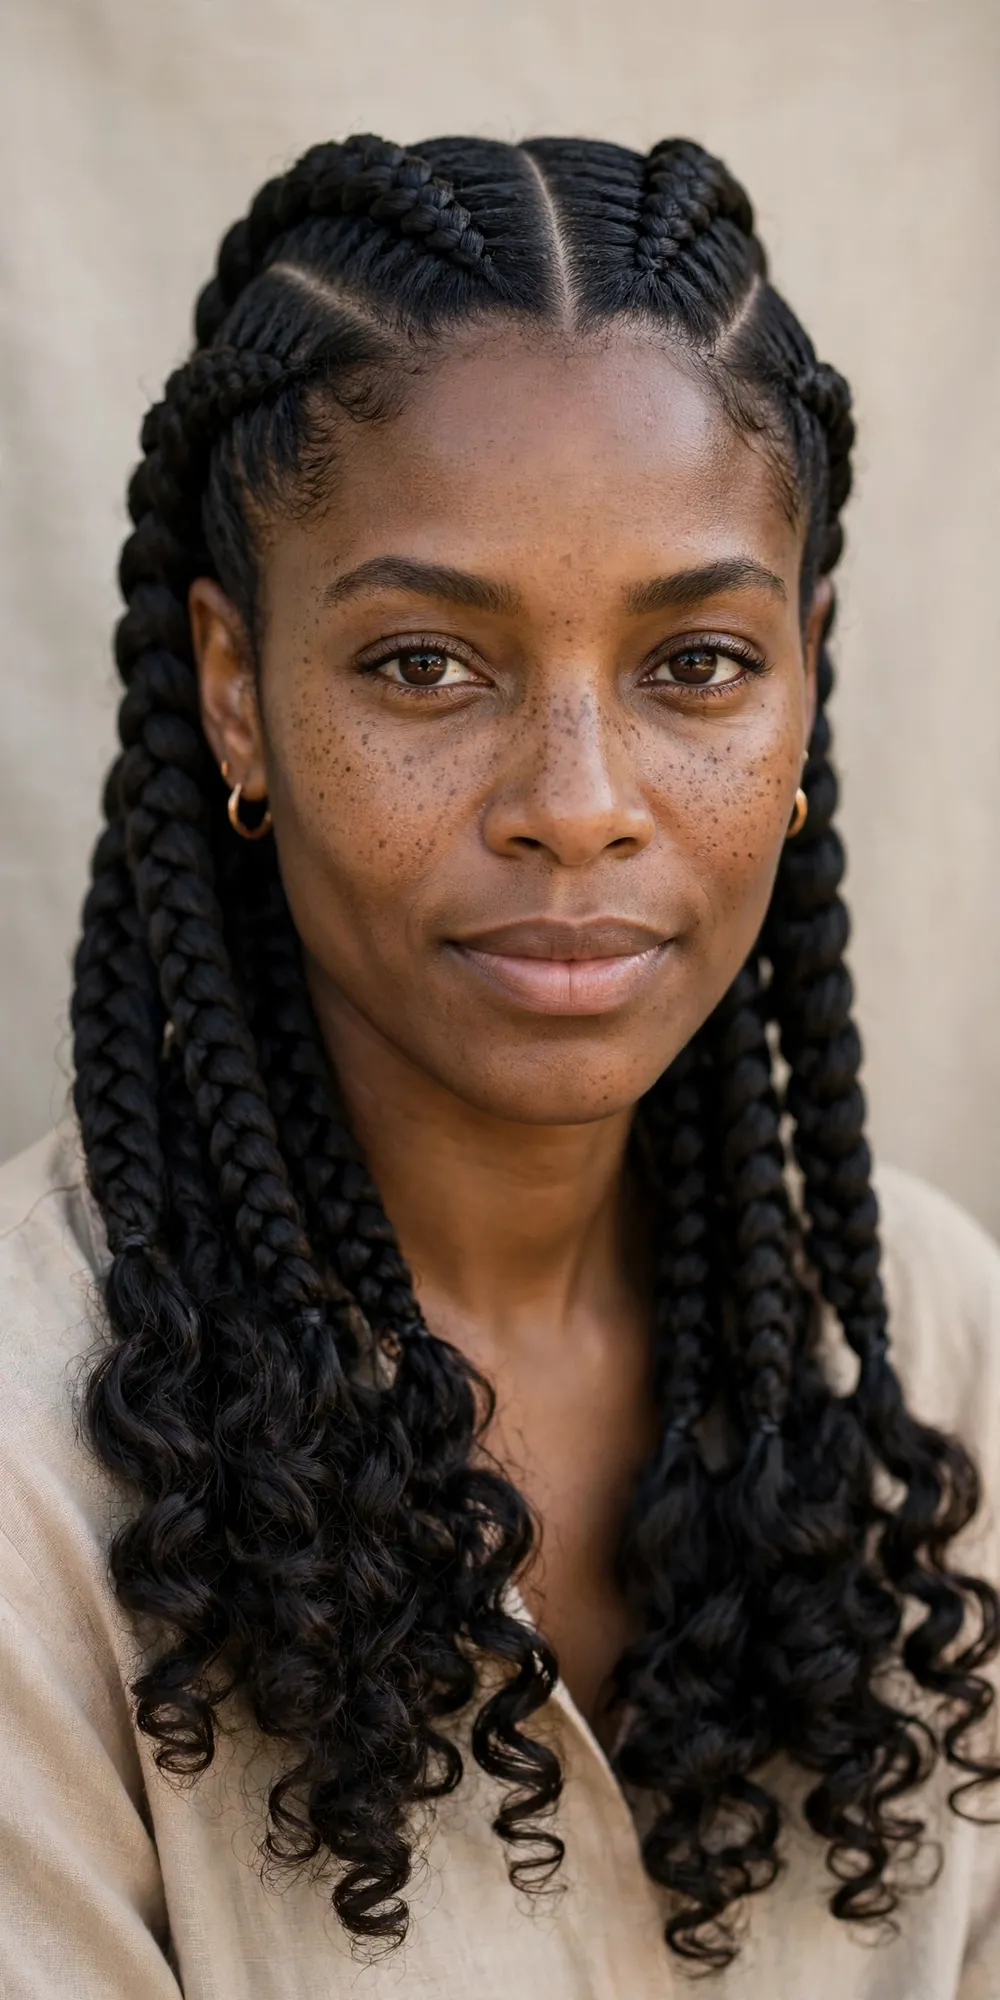
This is the signature goddess braid finish and the one to show your braider if you are unsure where to start. The cornrows themselves are sleek and sculpted, but the last few inches are left out and curled into bouncy, defined curls that soften the whole look. It suits every face shape and works for both everyday wear and special occasions. Ask for medium feed-in cornrows with the ends curled using flexi rods or a wand, and say whether you want loose waves or tighter curls. A curl-defining mousse applied while the ends are damp holds the shape without crunch. The curls are the first thing to frizz, so re-curl them weekly and keep them in a loose bonnet at night. Honestly, this is the lowest-risk way into goddess braids.
9. Zigzag Goddess Braids
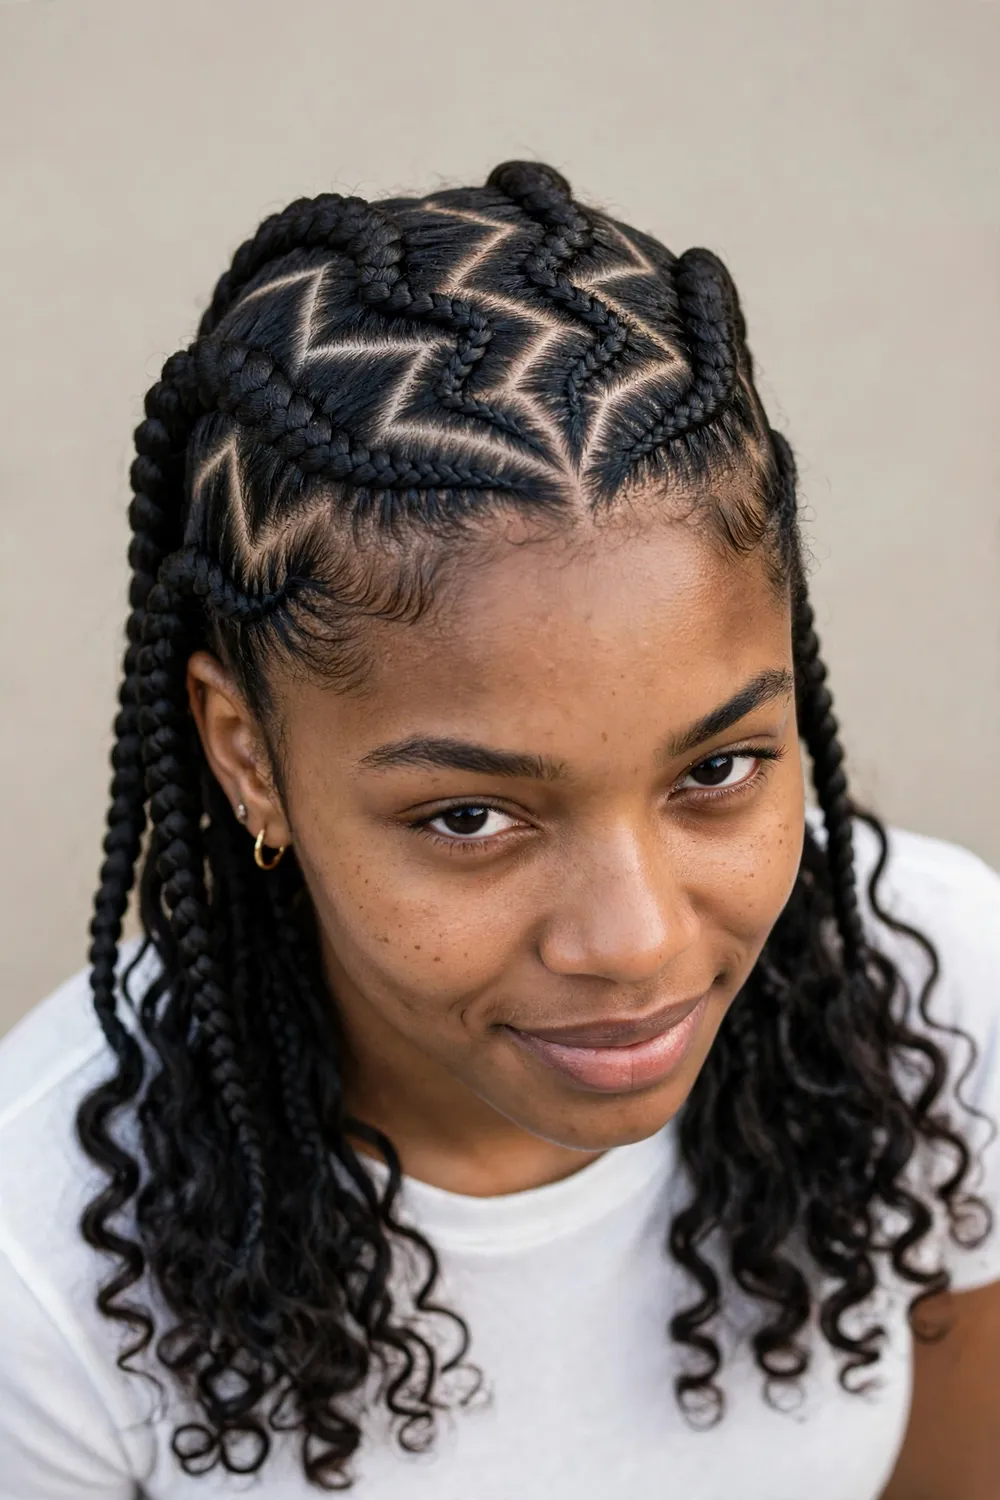
Zigzag partings give goddess braids a sharp, graphic edge. Instead of straight or curved lines, the sections are parted in clean zigzags, so the scalp pattern itself becomes the design. It suits confident dressers and anyone who likes geometric details, and it works particularly well on dark hair where the partings show up clearly. Ask for zigzag partings between medium cornrows, and check the lines in a mirror early, because a wobbly zigzag is hard to fix once the braids are in. Your braider will use a rat-tail comb plus a little edge control to keep the lines crisp. Avoid heavy scalp oils, which blur the partings. The style lasts as long as any goddess braids, but the zigzag is the first detail to soften as new growth comes in.
10. Goddess Braids with Gold Cuffs
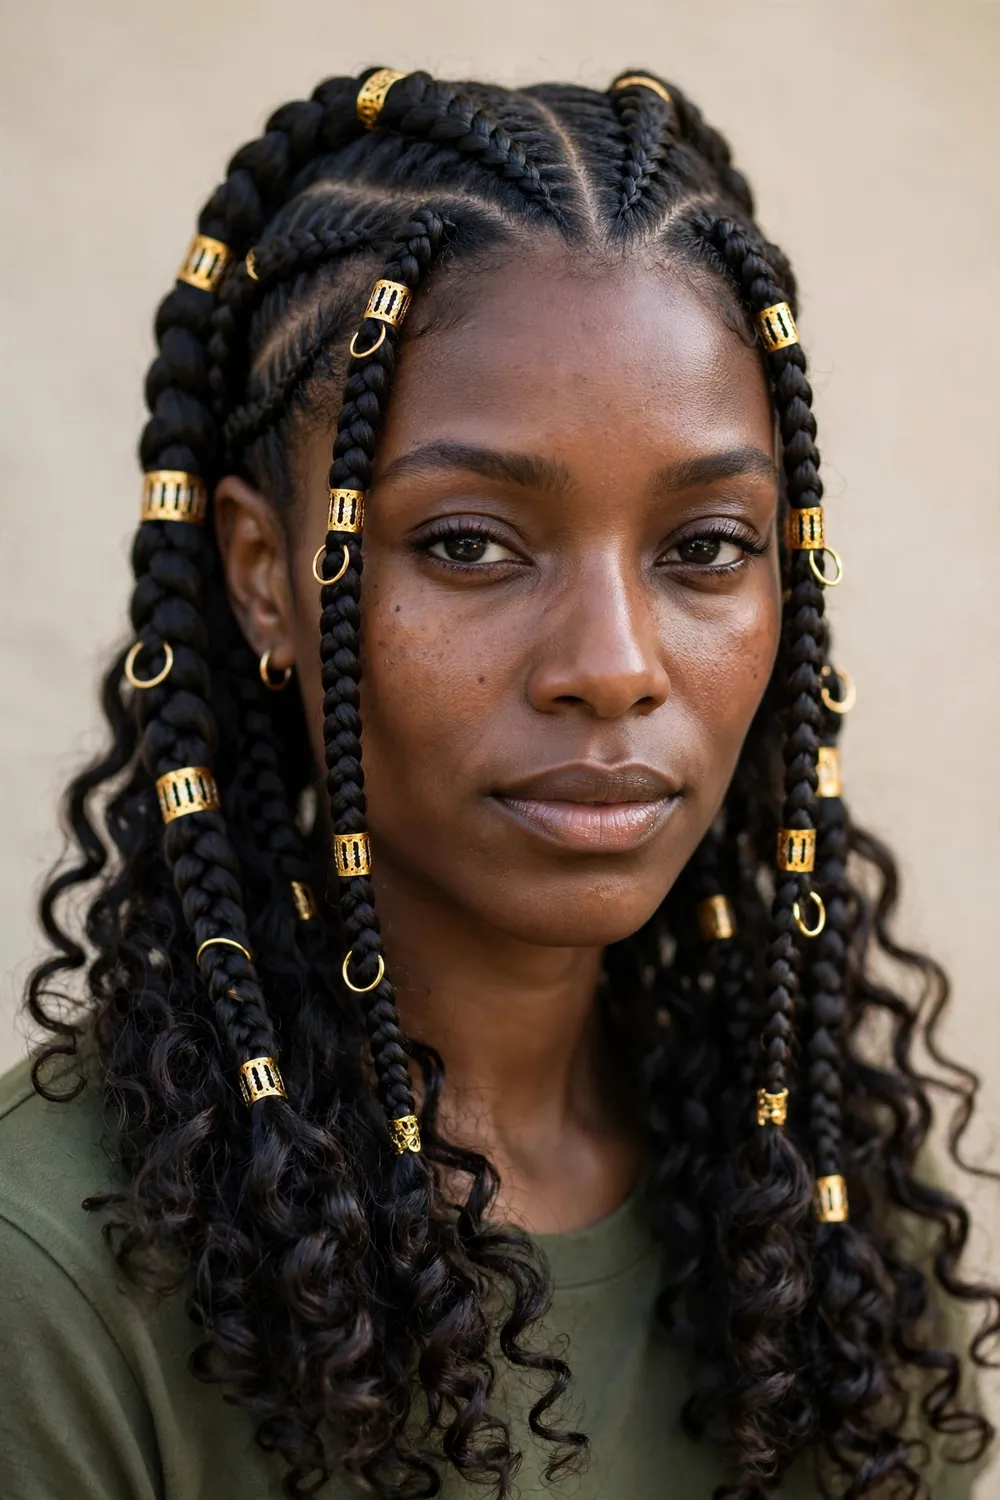
Gold cuffs are the quickest way to make goddess braids look expensive. Small gold rings and cuffs clip onto the cornrows at intervals, catching the light every time you turn your head. They suit evening looks, weddings and anyone who likes jewellery in their hair, and they work on any braid size. Ask your braider to place cuffs along two or three braids rather than every one, keeping the weight balanced and the look deliberate. Most cuffs simply squeeze closed around the braid, so they are easy to move or remove. Slide them off before washing, and take them out before bed if they press against your scalp. Good cuffs are reusable, so keep them for your next install rather than buying new ones each time.
11. Goddess Braids Ponytail
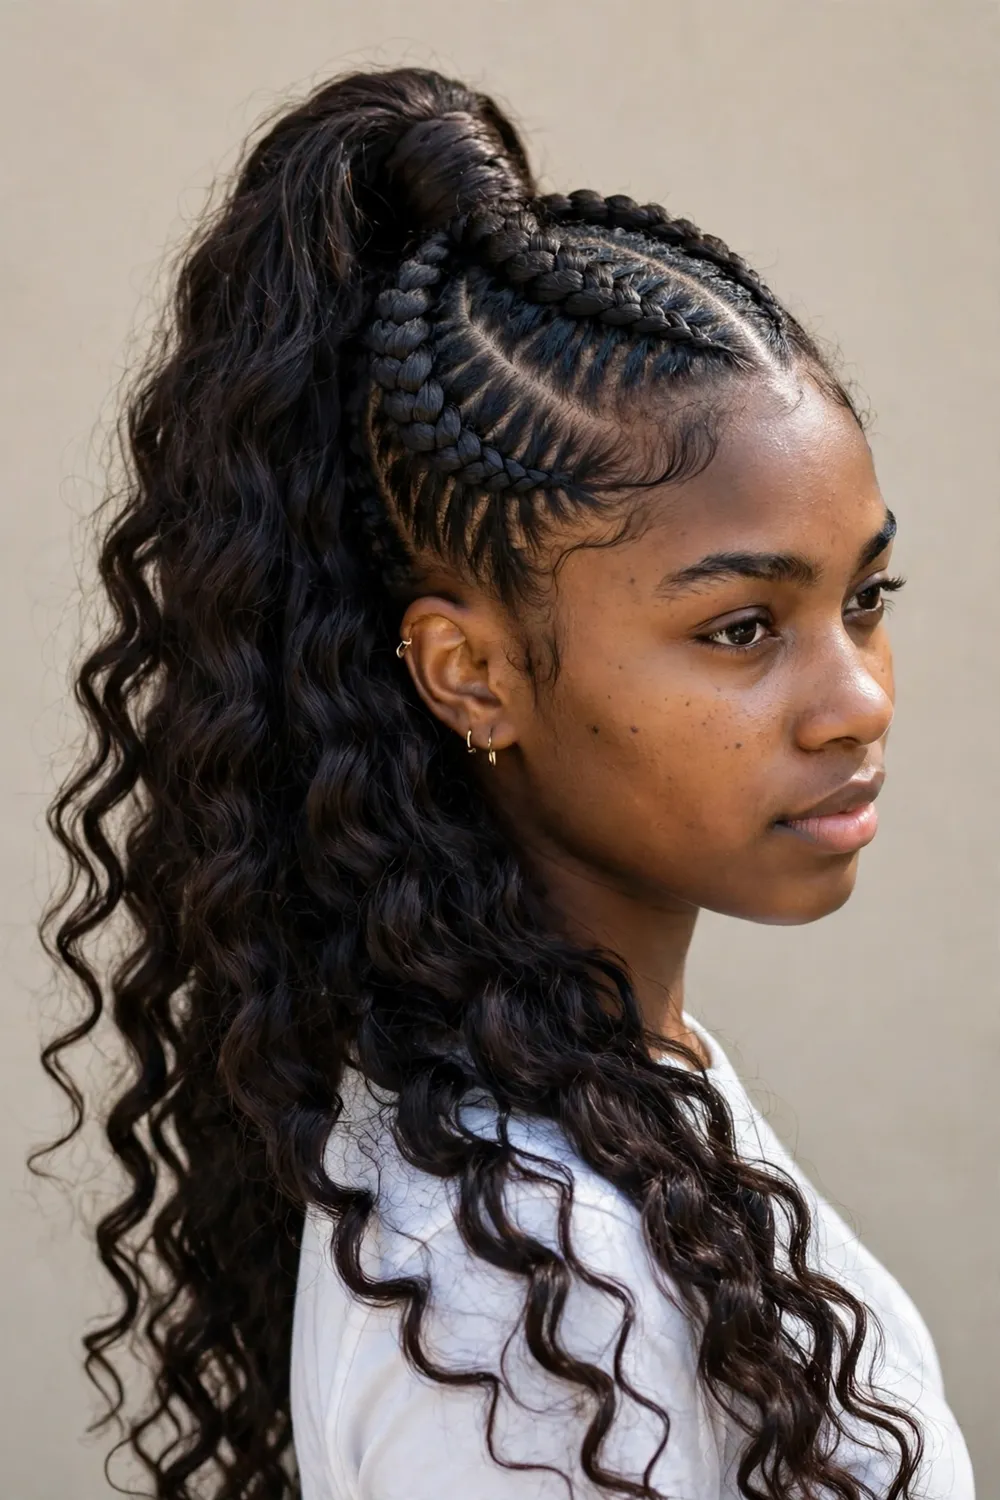
A high ponytail turns goddess braids into a sleek, gym-friendly style that still looks dressed up. The cornrows are braided upward and gathered at the crown, then the lengths fall into a ponytail with curls cascading down the back. It suits round and square faces because the height lengthens the face, and it is ideal if you work out or live somewhere hot. Ask for the braids to be directed into a high ponytail with the curls left long and loose. A strong-hold edge control keeps the hairline smooth. The ponytail can feel heavy by the end of the day, so take it down at night and let the braids rest loose. Re-curl the ends weekly to keep the cascade looking fresh.
12. Curved Goddess Braids with Side Bun
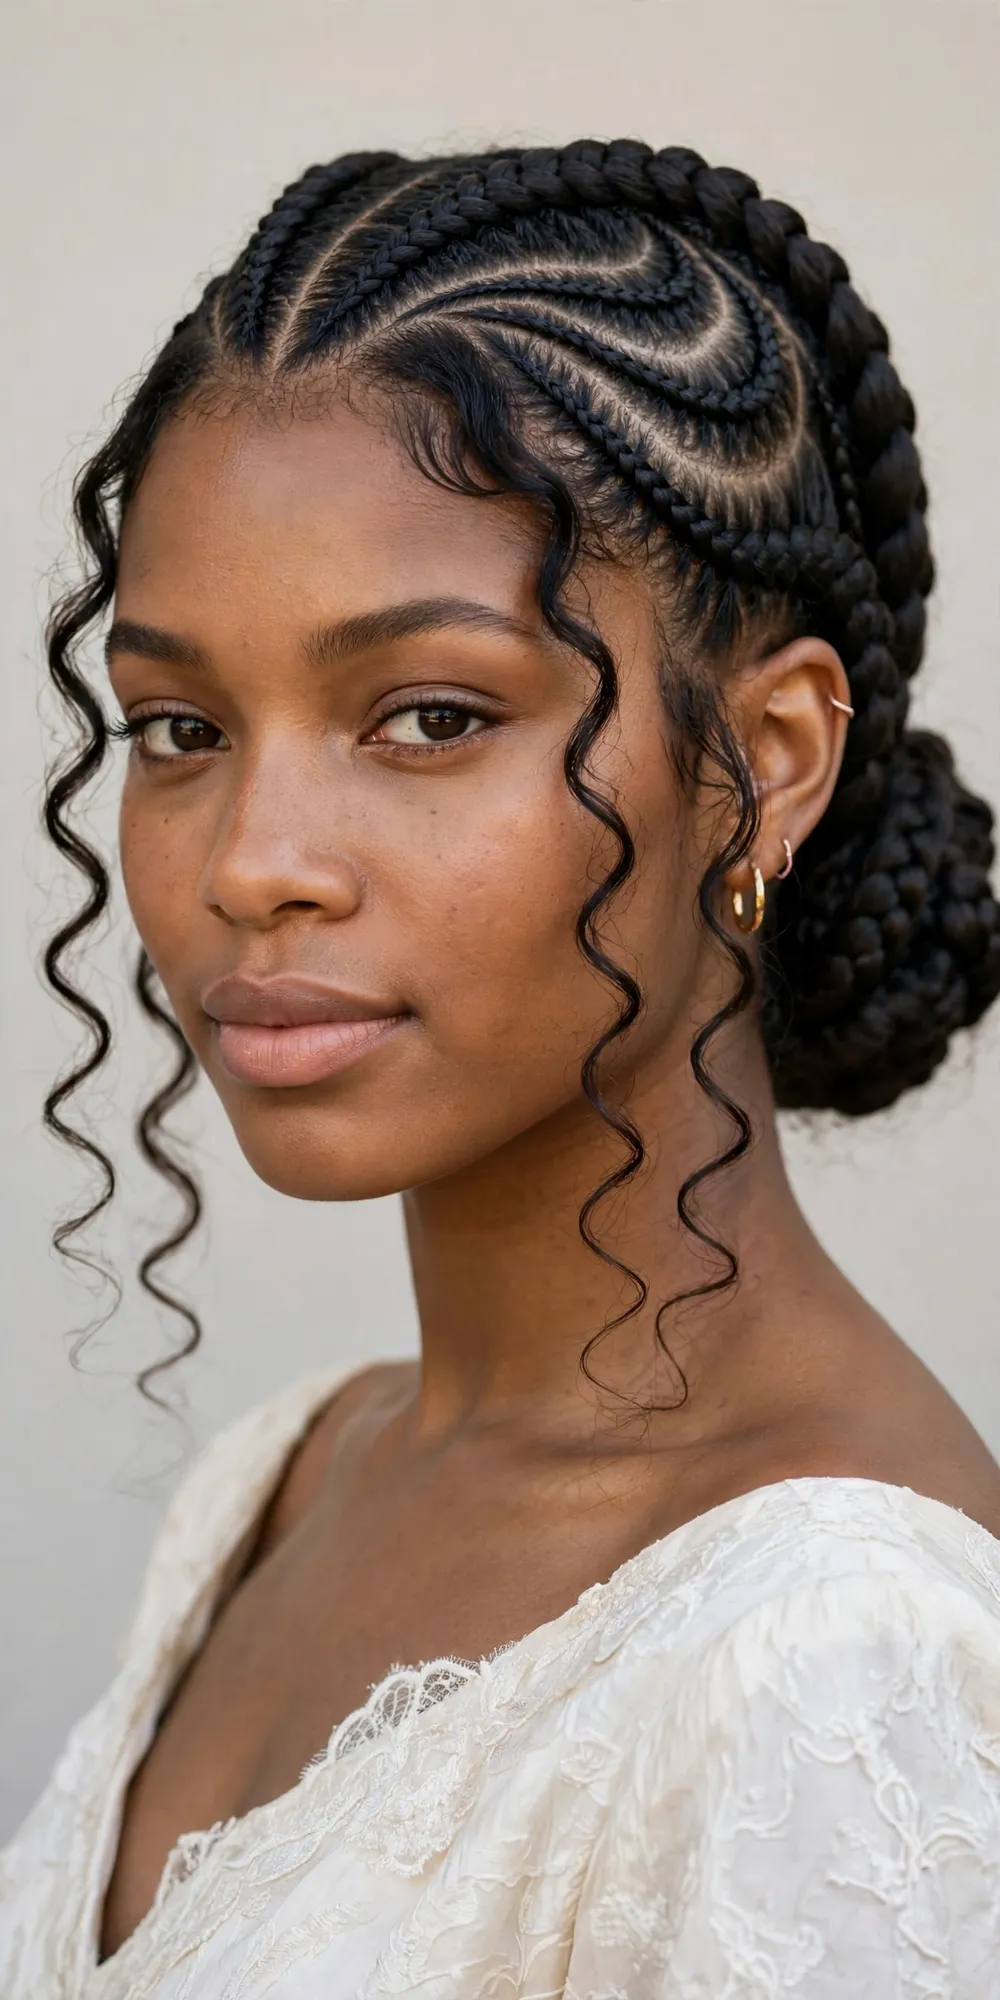
This is the occasion version of goddess braids: curved cornrows sweeping across the scalp into a low bun sitting just behind one ear. It reads elegant rather than sporty, which makes it a strong choice for weddings, proms and formal dinners. It flatters long necks and suits anyone who wants an updo without the severity of a top bun. Ask for curved partings flowing into a low side bun, with a few loose curls left out at the front to frame the face. Your braider will pin the bun in place with bobby pins and may wrap one braid around its base for a finished look. Edge control and a light shine spray complete it. The bun can loosen over a long evening, so carry a few extra pins.
13. Goddess Braids with Cowrie Shells
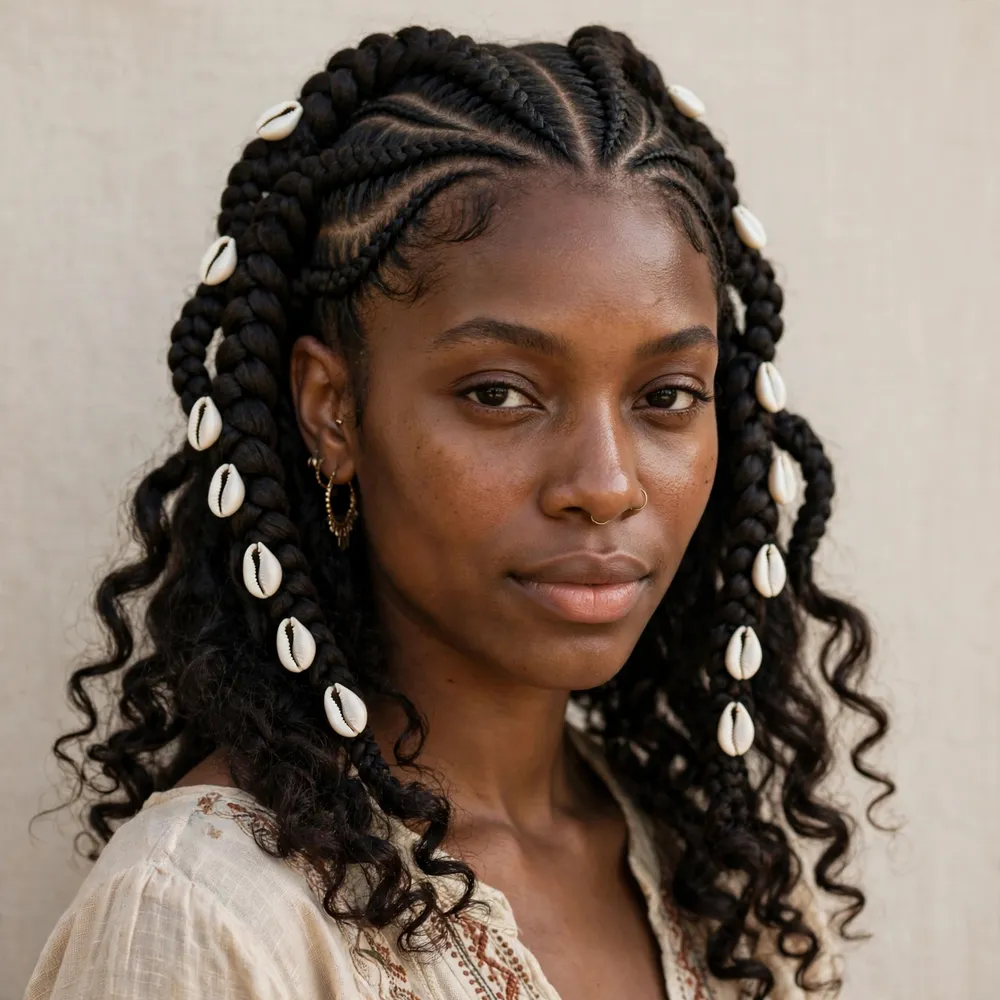
Cowrie shells bring a cultural, bohemian touch that plain braids cannot match. The small white shells are woven or tied into the ends of selected braids. They suit festival looks, beach holidays and anyone who wants their braids to nod to tradition — cowries have been worn in African hair and adornment for centuries. Ask your braider to add shells to a few braids at the ends, spaced so they do not clump together or weigh one side down. They are usually threaded on with a small elastic or tied with thread. Shells can click against each other and snag on fabric, so a satin bonnet at night is a must, and remove them before washing. Like beads, they are reusable, so save them after takedown.
14. Goddess Braids with Honey Highlights
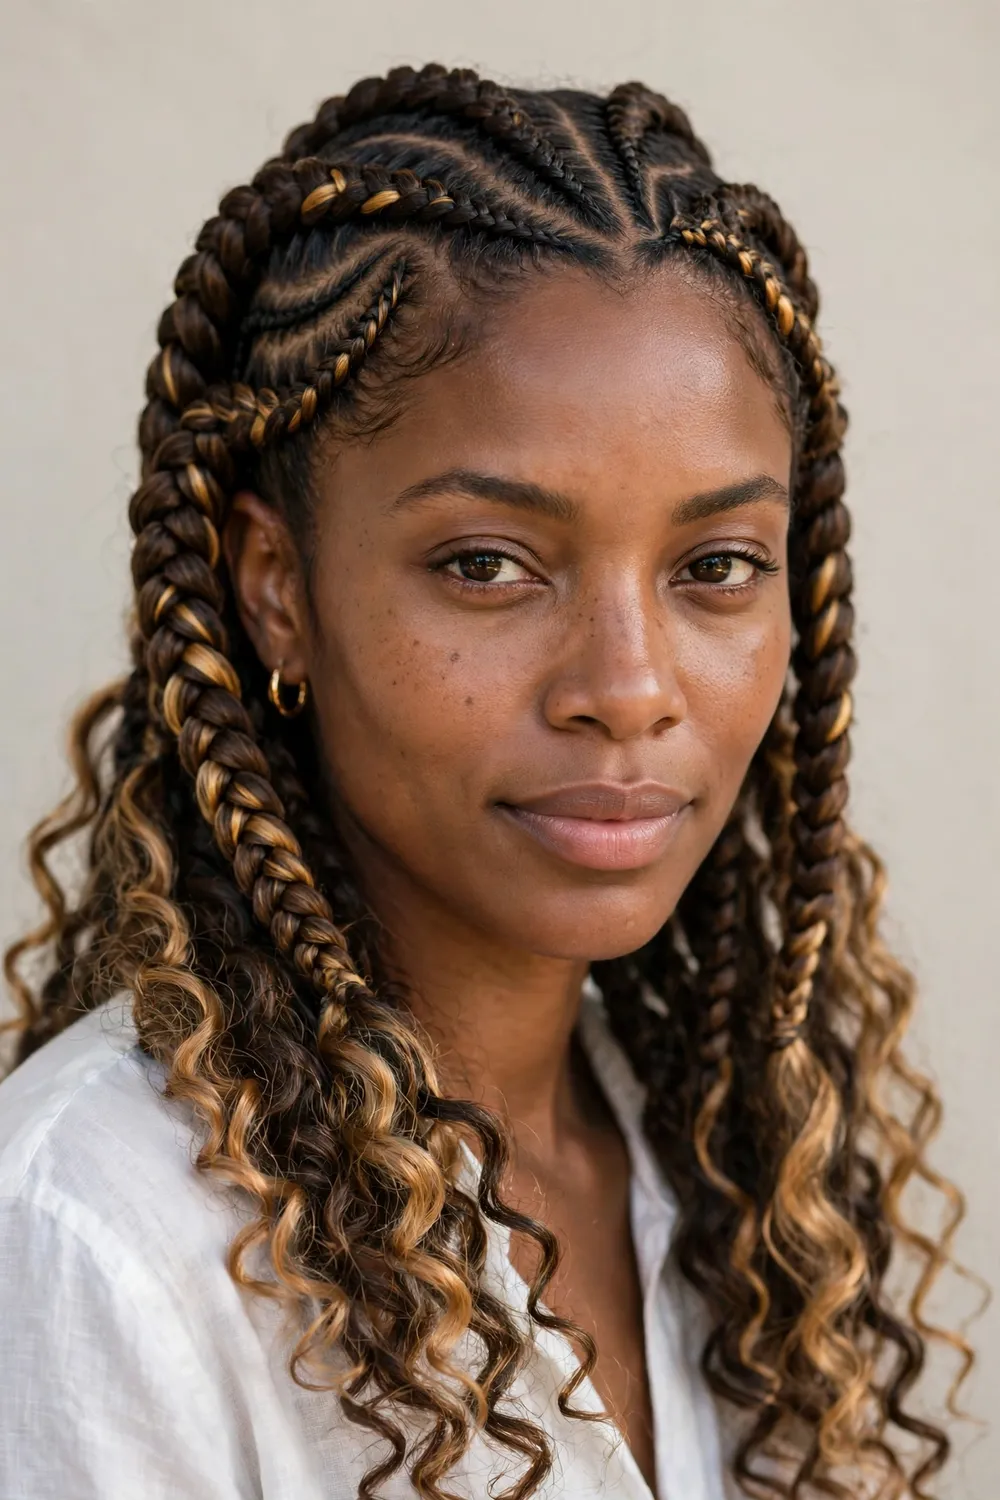
Honey highlights add warmth and dimension without committing you to a full colour change. Warm honey-blonde strands of braiding hair are woven through dark cornrows, so the colour catches the light as the braids curve. It suits warm skin tones especially well. Ask for honey-blonde braiding hair mixed through — not in every braid, but in alternate ones or as face-framing strands. The effect looks best with medium cornrows, where the colour has room to show. No dye touches your natural hair, so there is no regrowth line to worry about. The usual goddess braid aftercare applies, and a colour-safe mousse keeps the highlighted ends looking bright rather than dull.
15. Burgundy Goddess Braids
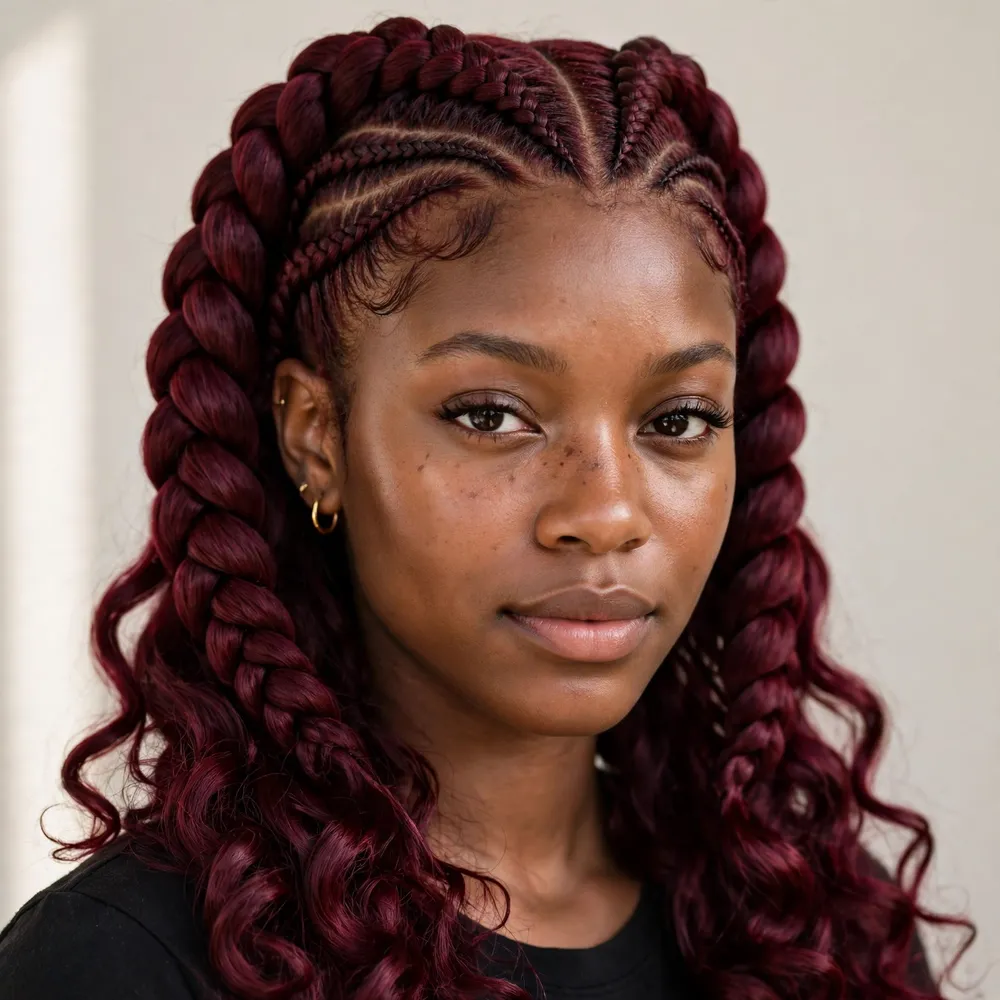
Burgundy is a rich, wine-toned colour that looks striking on deep skin tones and adds instant depth to goddess braids. The colour reads as dark indoors and glows red in sunlight, so it feels bold without being loud. It suits autumn and winter especially. Ask for burgundy braiding hair in your chosen shade — a deep wine is the most wearable, while a brighter cherry burgundy makes more of a statement. The colour is in the extensions, not your own hair, so there is no bleach and no damage. Burgundy can transfer slightly onto light pillowcases when new, so use a dark bonnet for the first few nights. Keep the braids moisturised with a light oil, since coloured extension hair can look dry faster than black.
16. Goddess Braids with Hair Jewelry
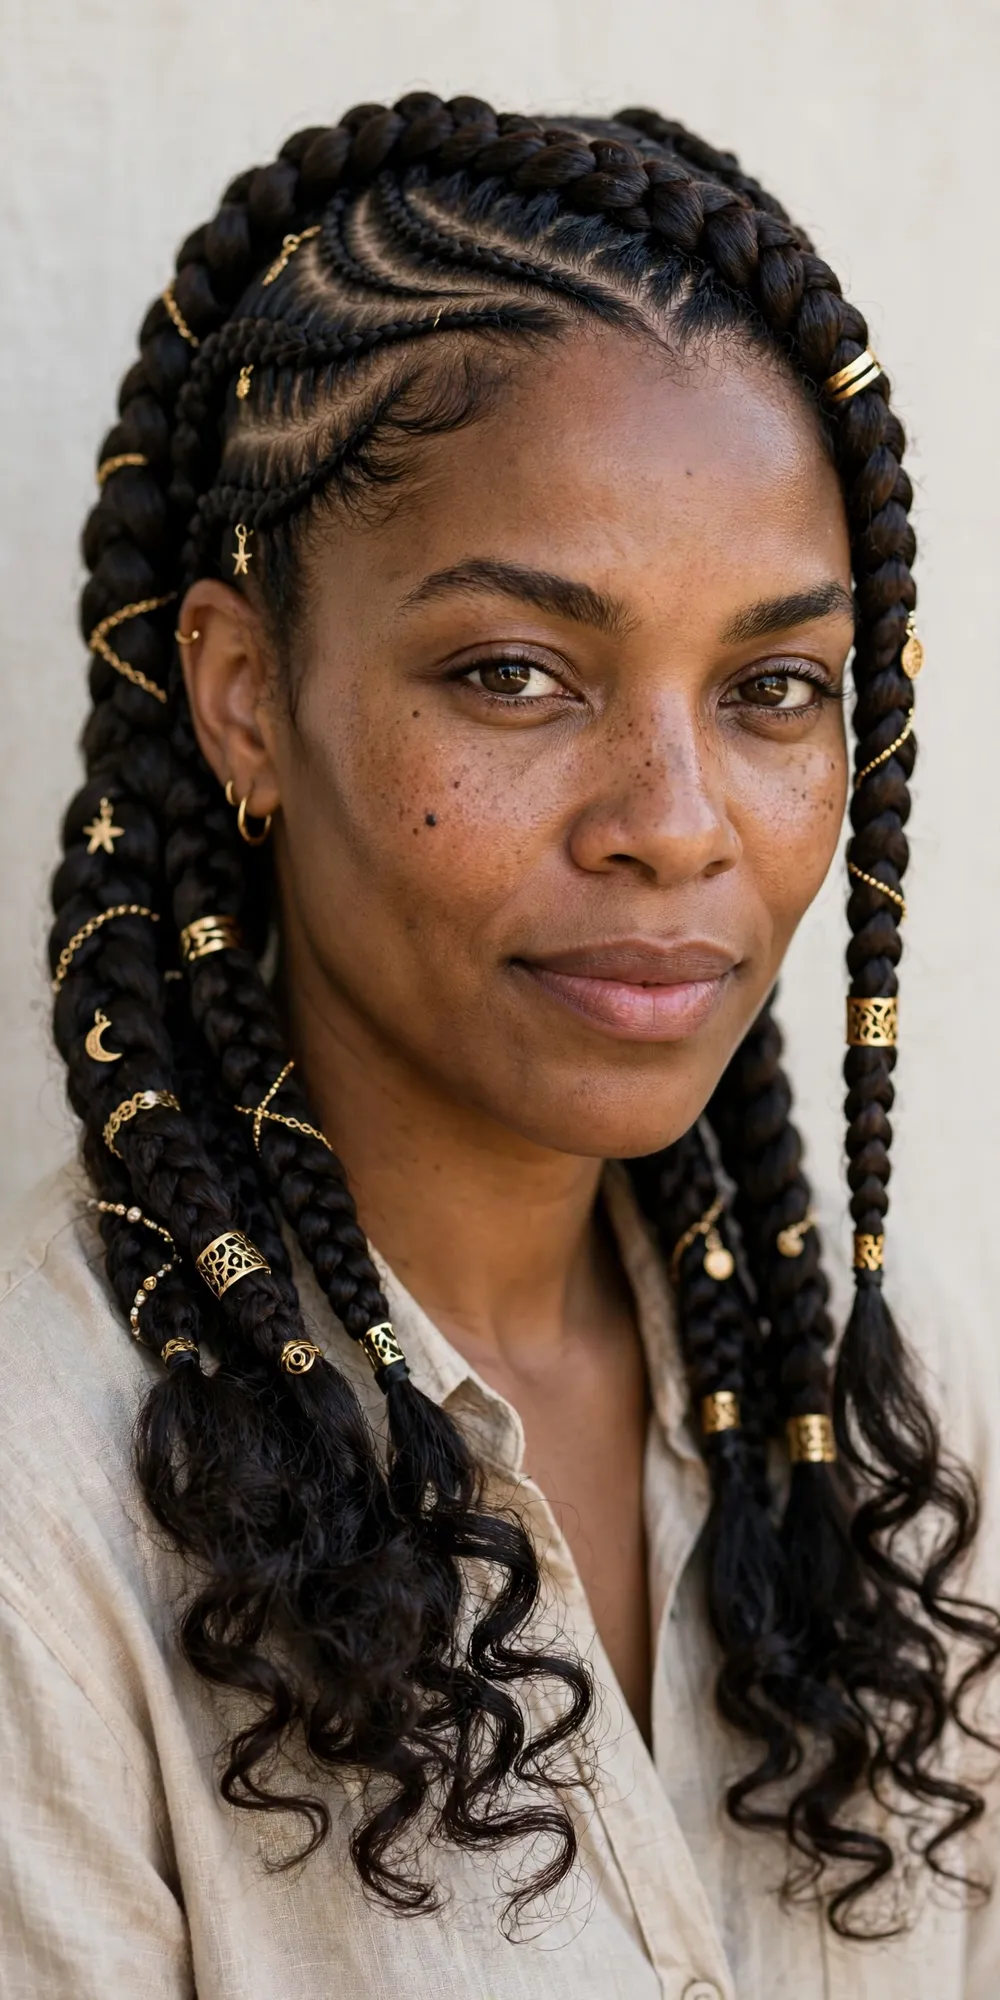
Hair jewellery is the finishing touch that turns goddess braids into an occasion style: delicate chains draped across the cornrows, small charms, cuffs and rings placed where they catch the eye. It suits weddings, parties and photoshoots, and it works best on medium or jumbo braids where the pieces have something substantial to sit on. Ask your braider to place the jewellery after the braids are finished, so you can see the layout and move pieces around before they are fixed. Chains usually clip or pin in. Keep the pieces light — heavy jewellery pulls on the braids and gets uncomfortable fast. Remove everything before washing or sleeping, and store the pieces in a small pouch. The braids underneath need the same care as any goddess style.
17. Half-Up Goddess Braids
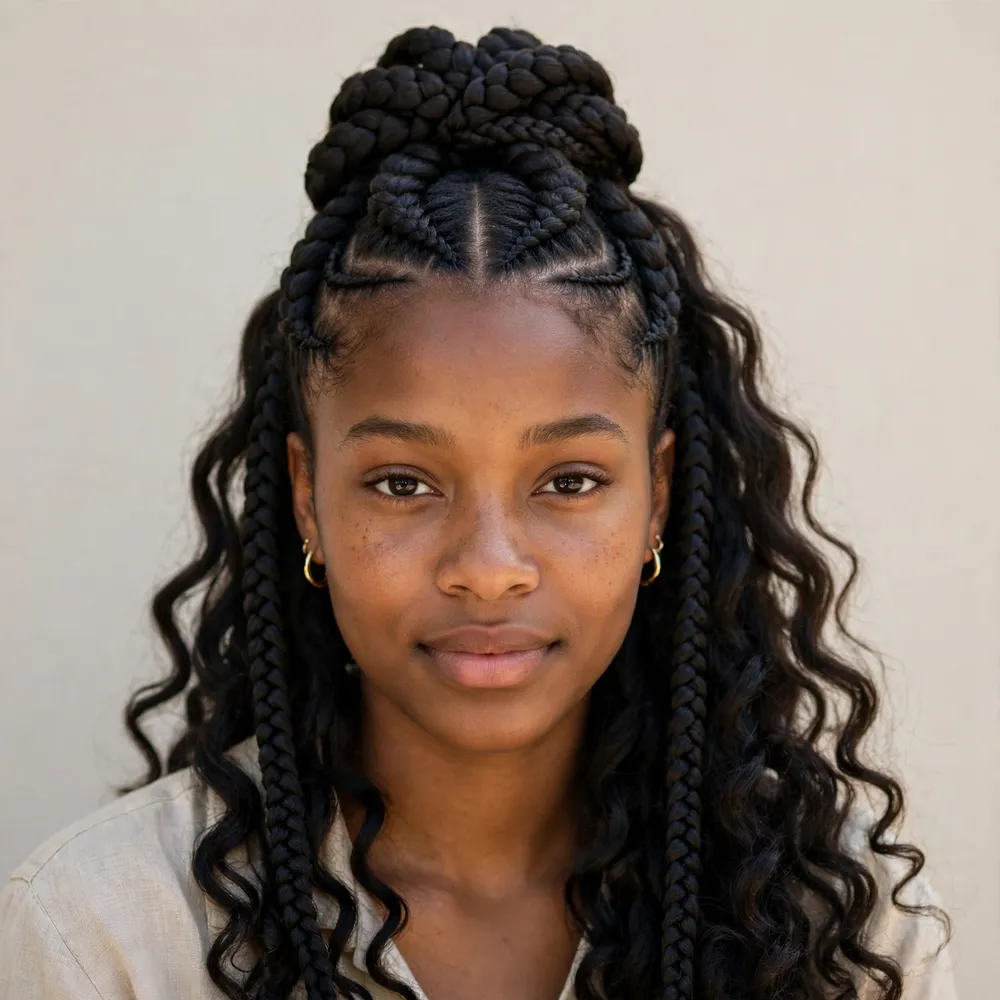
Half-up goddess braids give you the best of both worlds: the top cornrows are pinned up and away from your face, while the rest falls loose with soft curls. Ask your braider for four to six cornrows across the front and crown, gathered into a small bun or tied section at the top, with the lower braids left down and finished with curly ends. A little edge control smooths the hairline, and a light mousse keeps the curls defined without crunch. Maintenance is easy — the pinned section holds its shape for days, and you can refresh the loose curls with a dab of curl cream in the morning. It suits round and oval faces especially well, since the height on top lengthens the face.
18. Goddess Braids with Loose Natural Hair
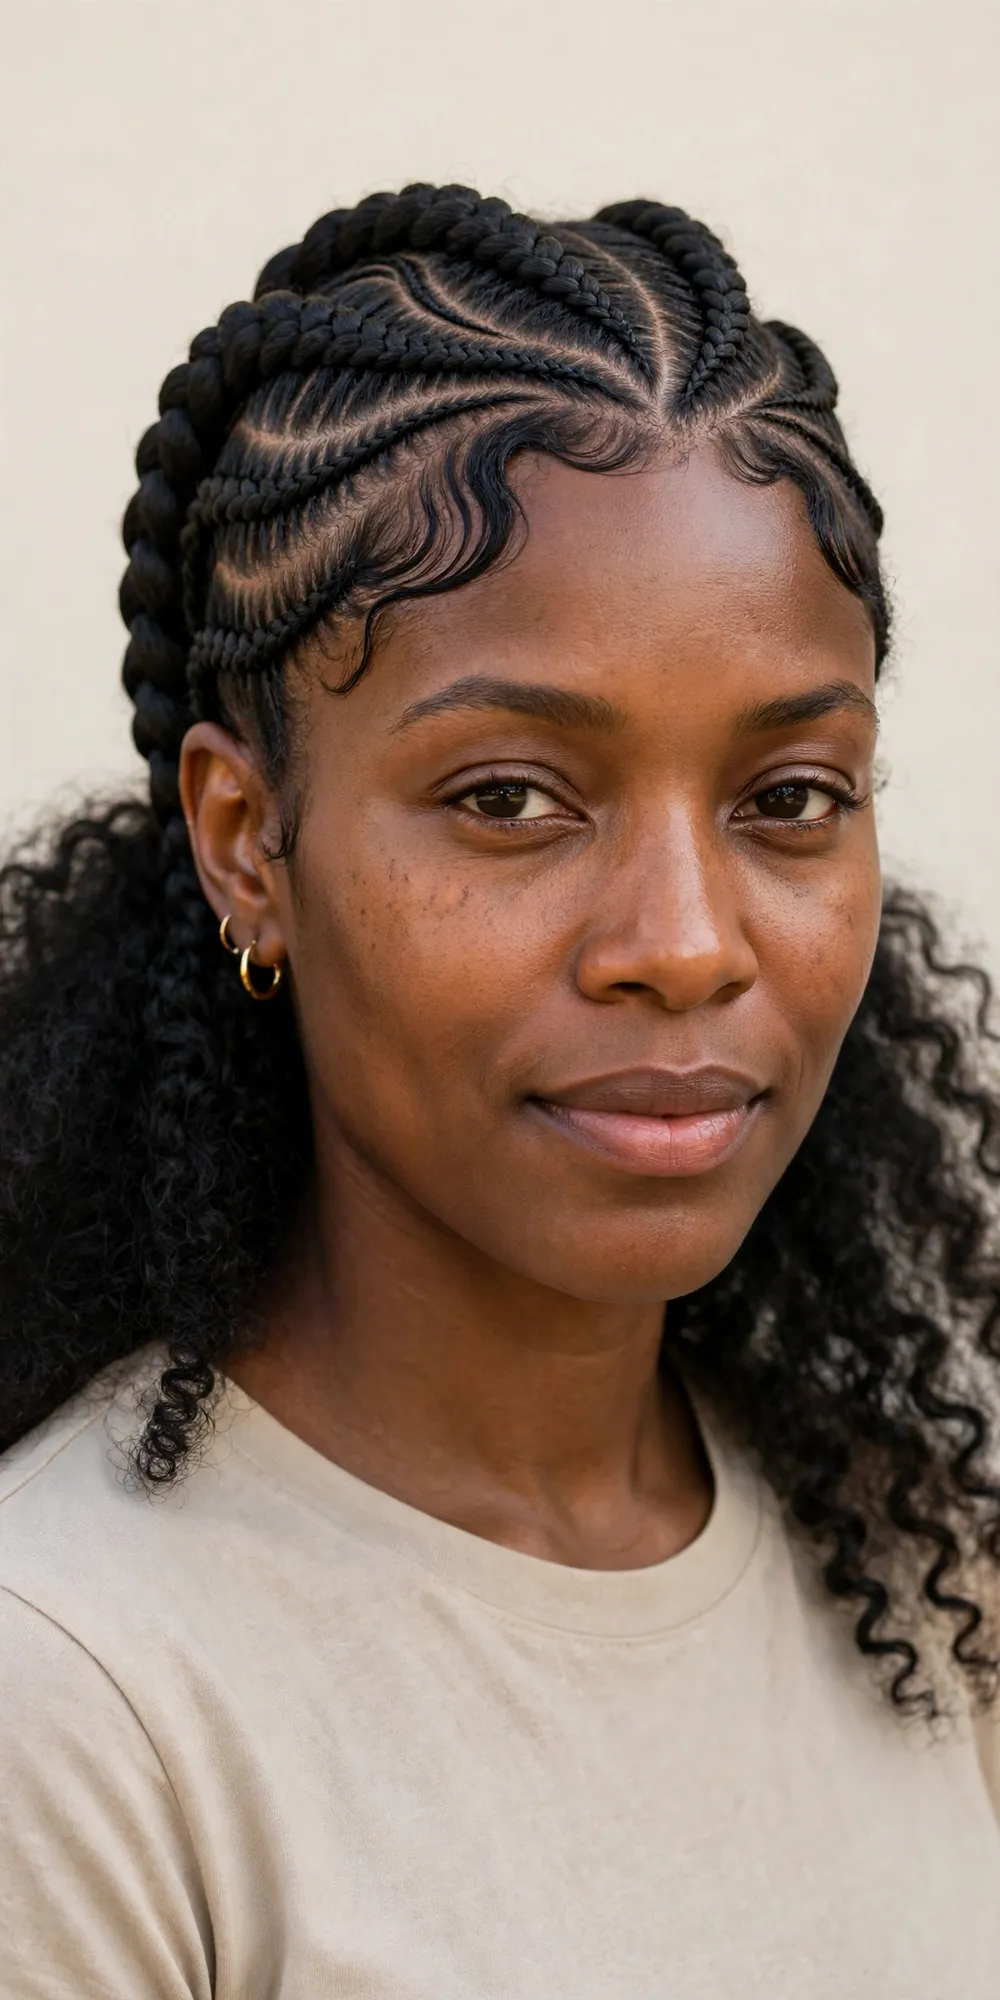
This one mixes cornrows at the front with your own natural curls left out at the back, so the style feels softer and more personal than a full head of braids. Ask your braider for cornrows across the front half — straight back or gently curved — and leave the back section free. Your own curls get defined with a leave-in conditioner and a curl-defining cream, and the braided part gets a light oil sheen. The trade-off is honest: the loose hair needs daily attention, a quick refresh each morning, while the braids look after themselves. It is a lovely choice for anyone who wants protective styling up front and freedom at the back.
19. Goddess Braids Crown
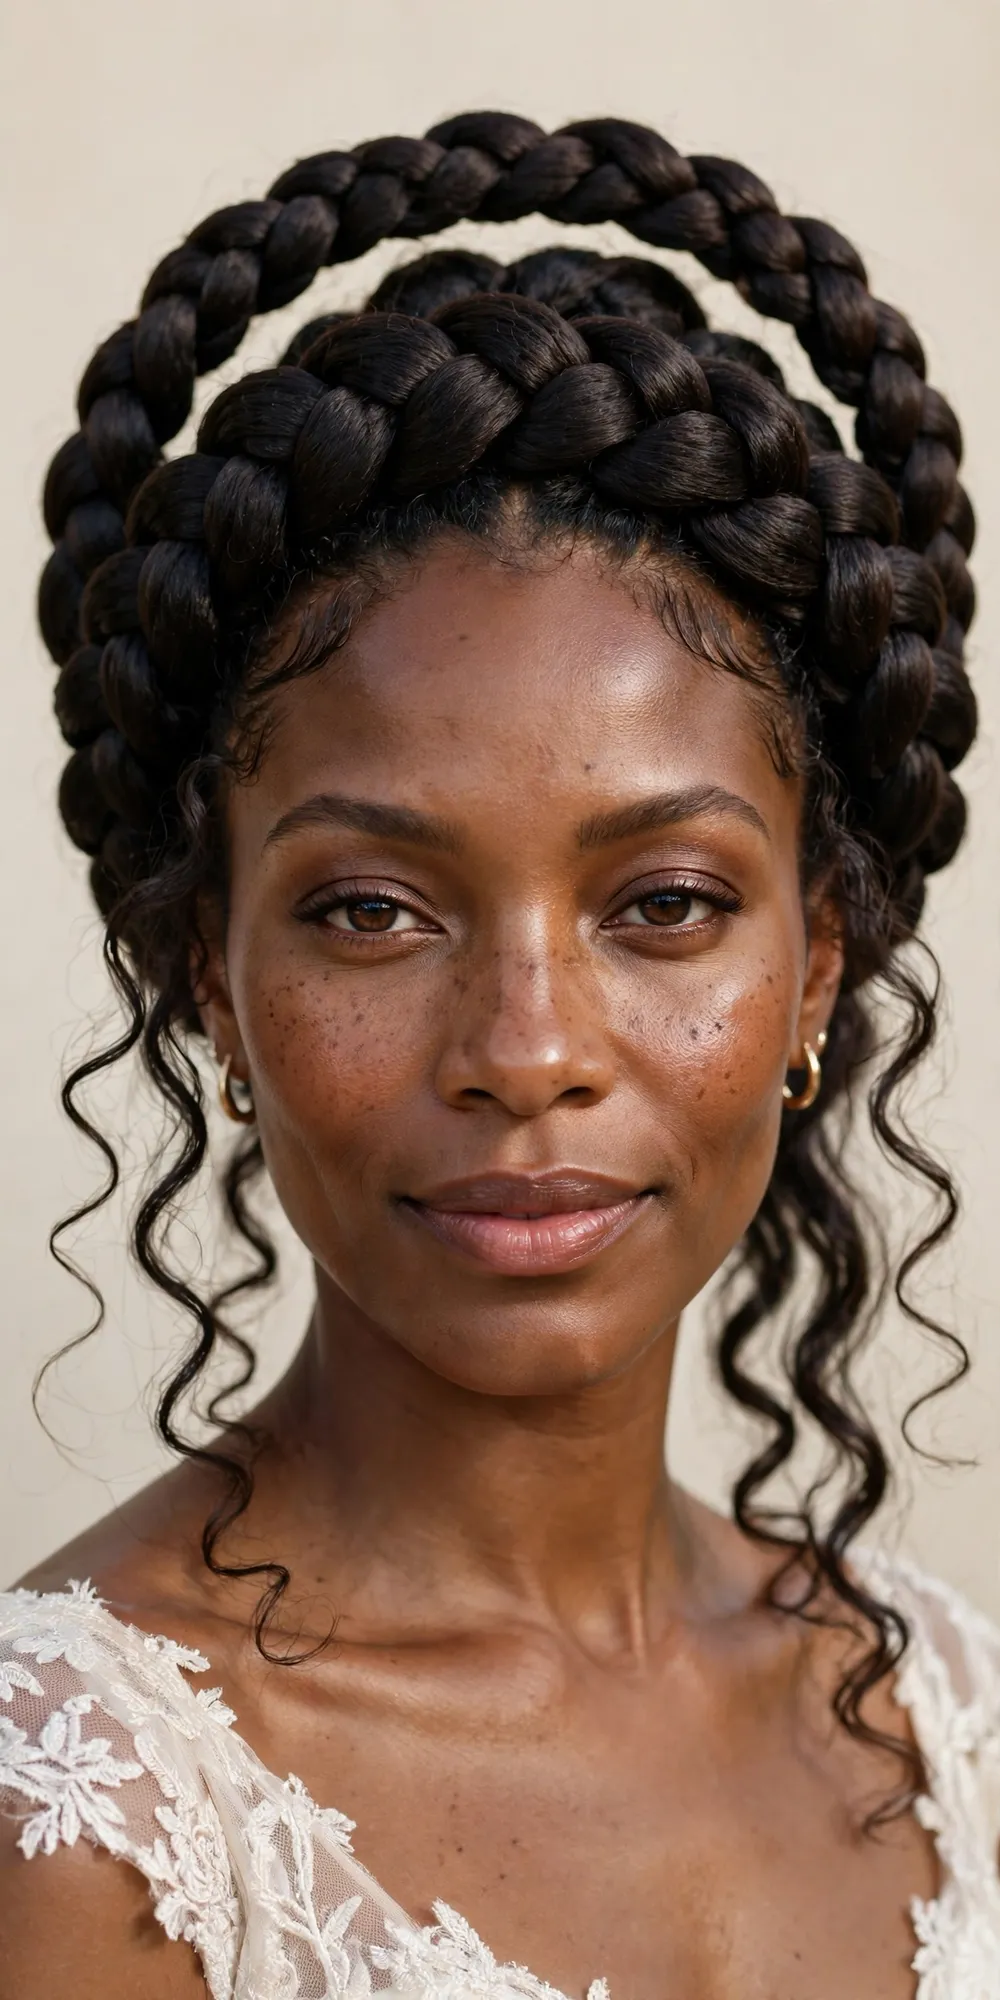
The goddess braids crown wraps the cornrows around your head like a halo, and it is one of the most regal updos in this whole list. Ask your braider to braid the cornrows in a circular pattern, starting at the nape and working around, then pin the ends underneath so the circle closes neatly. The curls can be tucked in or left peeking out at the sides for softness. Gold cuffs or a few small flowers take it from pretty to unforgettable. It holds up well through a long event — no hair falling in your face while you dance — but do expect a longer appointment, since the circular pattern takes more time than straight-back rows.
20. Triangle Part Goddess Braids
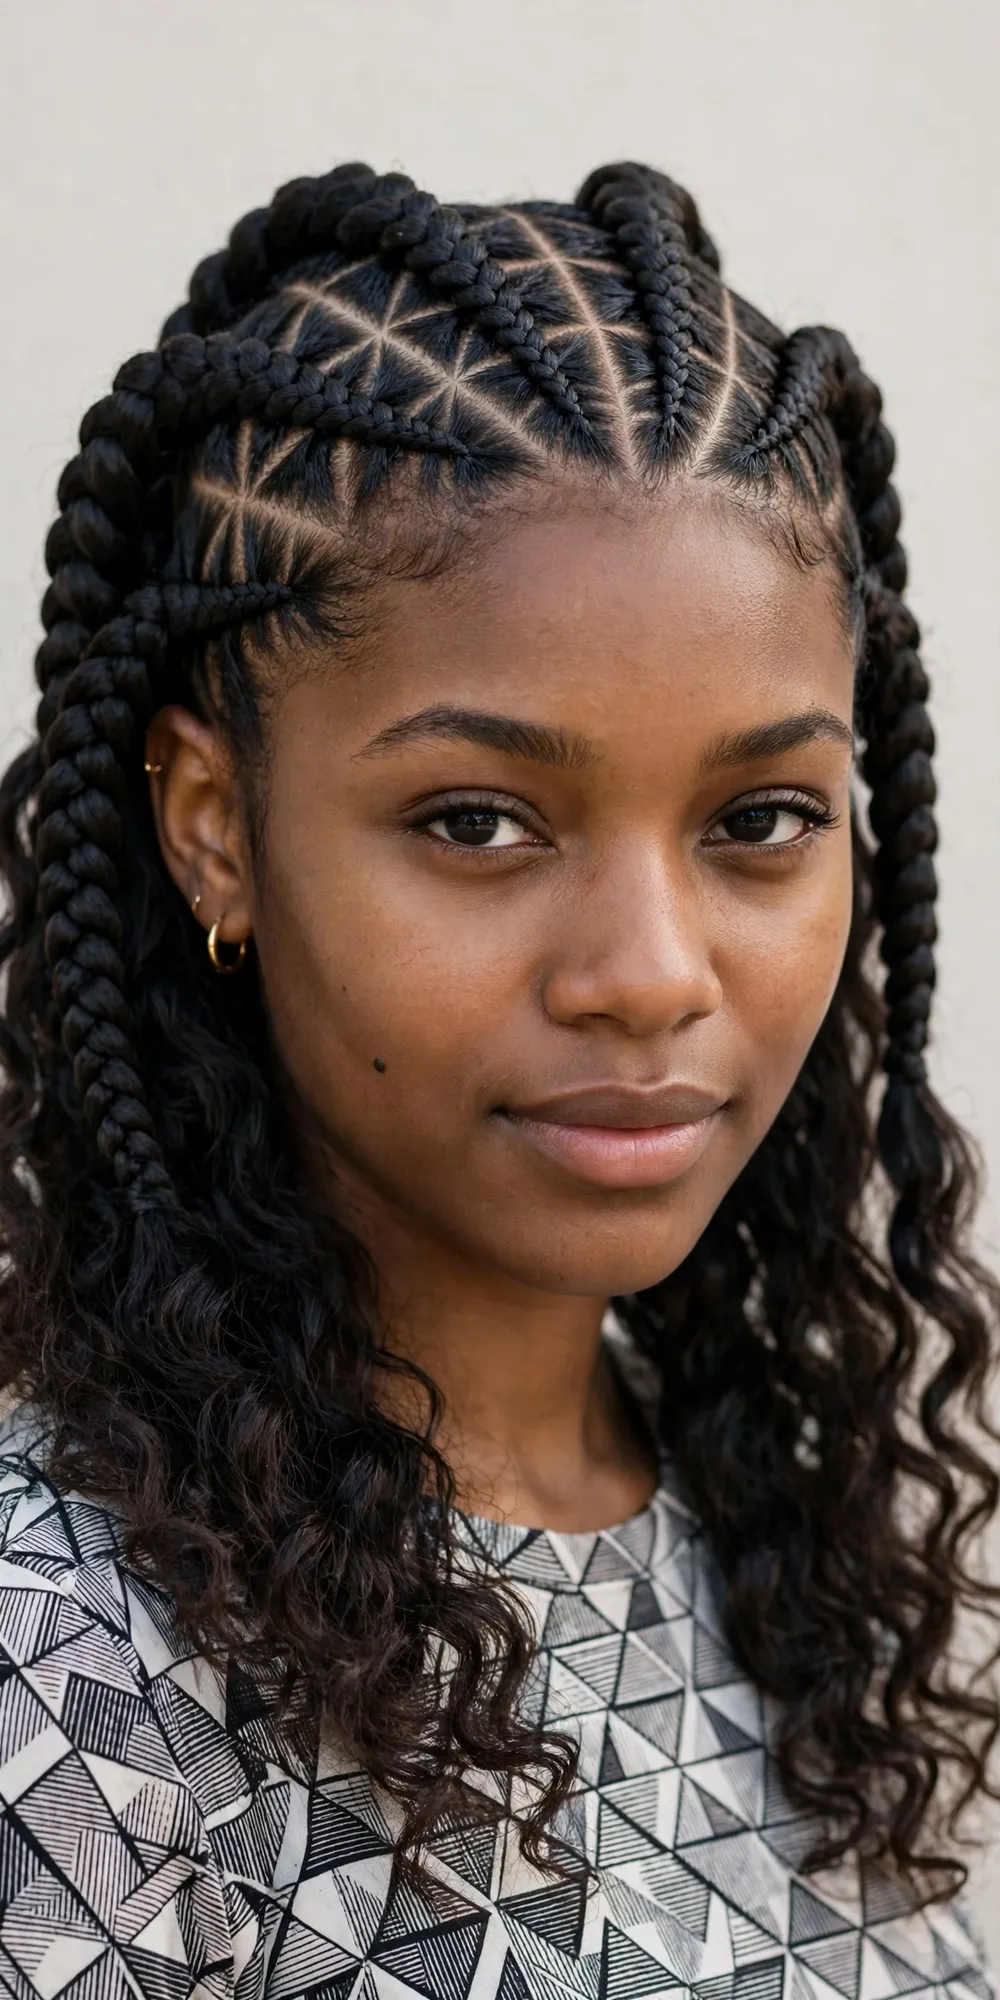
Triangle part goddess braids swap the usual straight partings for crisp triangles, and the geometric base gives the whole style a sharp, modern edge. Ask your braider for clean triangle sections, roughly even in size, with the cornrows following the triangle lines and finishing in curly ends. Precision matters here, so pick a braider who is confident with parting; a ruler or rat-tail comb and a steady hand are what separate a neat result from a wonky one. A little edge control defines the triangles further. The style suits anyone who likes bold, graphic looks, and it photographs brilliantly. Maintenance is the same as any goddess braid set, though the partings show regrowth a touch sooner, so plan for four to five weeks of wear.
21. Jumbo Goddess Braids
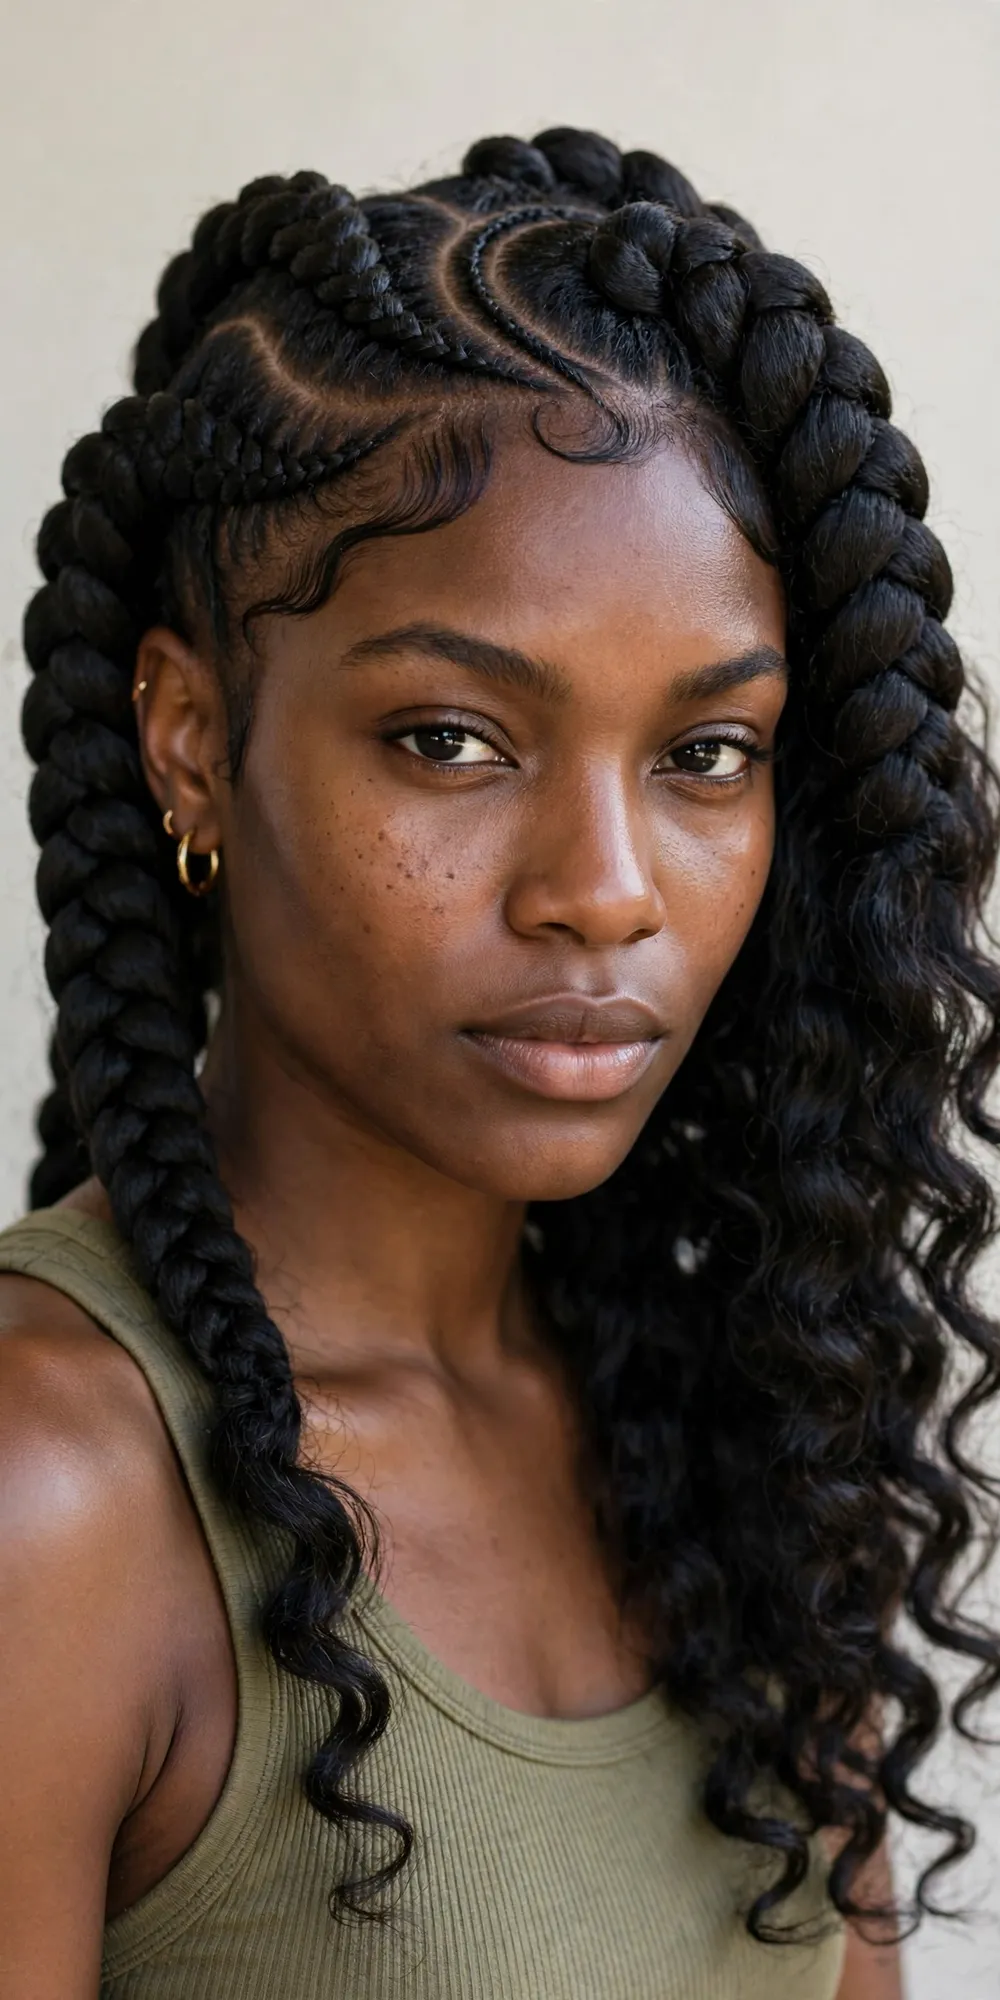
Jumbo goddess braids use fewer, thicker cornrows — usually four to six — for a bold look that turns heads and, just as importantly, takes far less time in the chair. Ask your braider for wide feed-in sections with chunky braiding hair and curly ends, keeping the tension gentle at the hairline even though the braids are big. The weight is distributed across fewer rows, so it should never feel like it is pulling. A light oil on the scalp and a silk scarf at night are all the upkeep you need. Jumbo braids suit thick, dense hair best, and they are a smart pick for a first-timer who wants the goddess look without the long appointment. Expect around two to three hours for the install.
22. Mini Goddess Braids
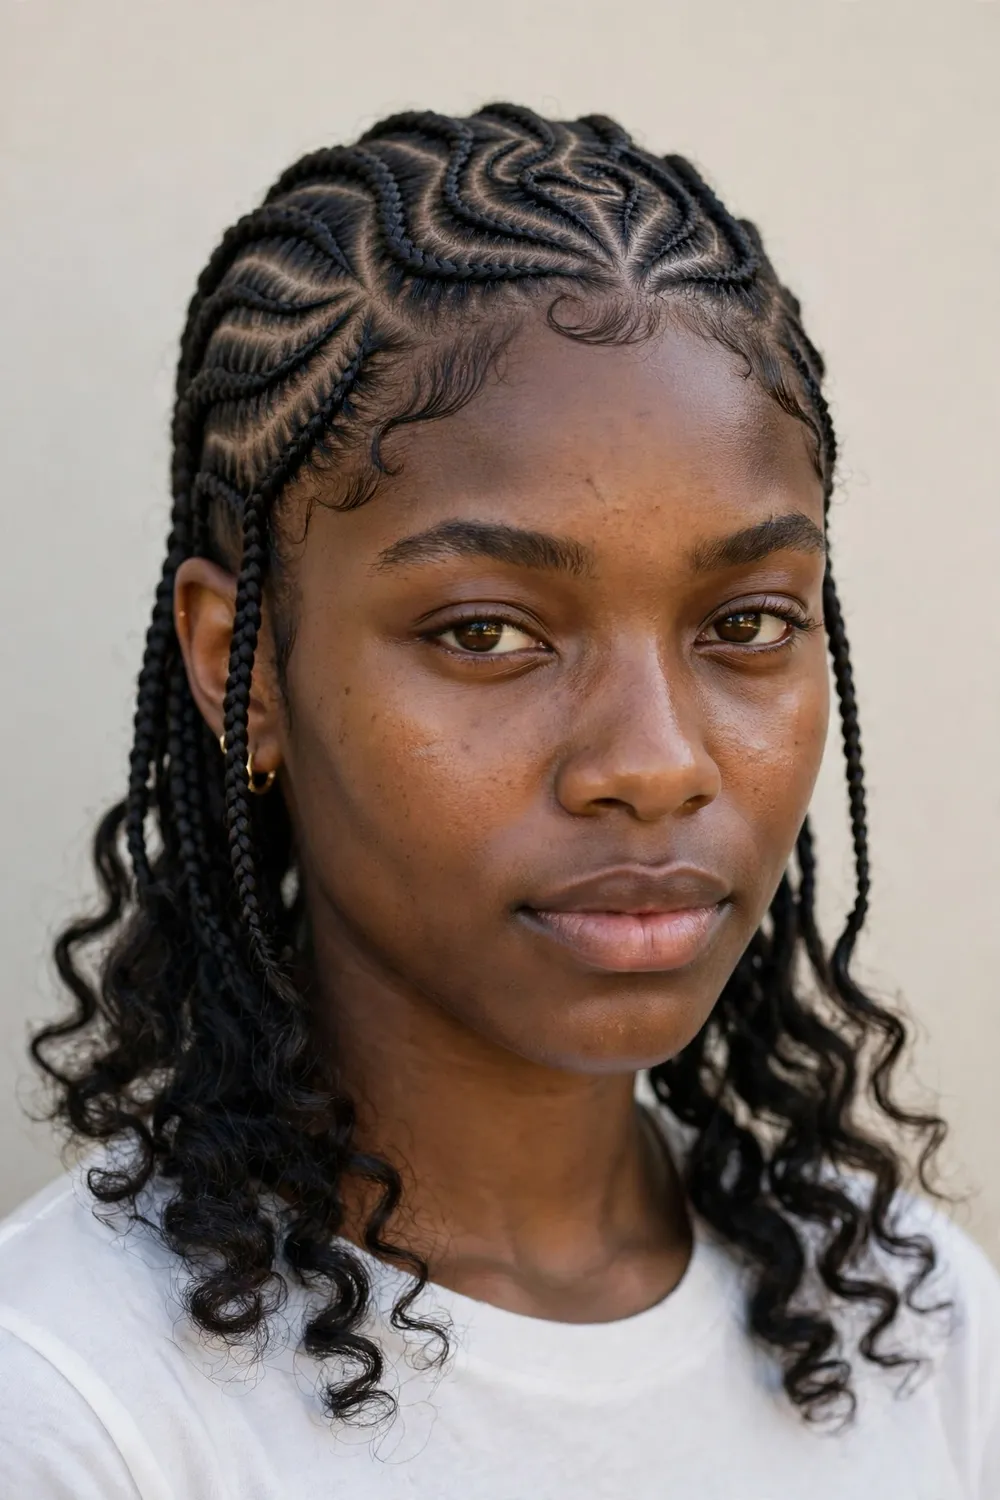
Mini goddess braids are the delicate end of the spectrum: fine, narrow cornrows with intricate parting designs that look almost like lacework up close. The catch is the install time, which can run to five or six hours, so book a morning appointment and bring something to listen to. Ask your braider for slim feed-in rows, ten or more, with your chosen parting pattern and curly ends. Because the braids are small, the curls at the ends look extra pretty and bouncy. This style suits anyone with patience and a love of detail, and it is a great choice for a holiday, since it stays neat for weeks with just a silk bonnet at night and a weekly scalp oil.
23. Goddess Braids with Edges Laid
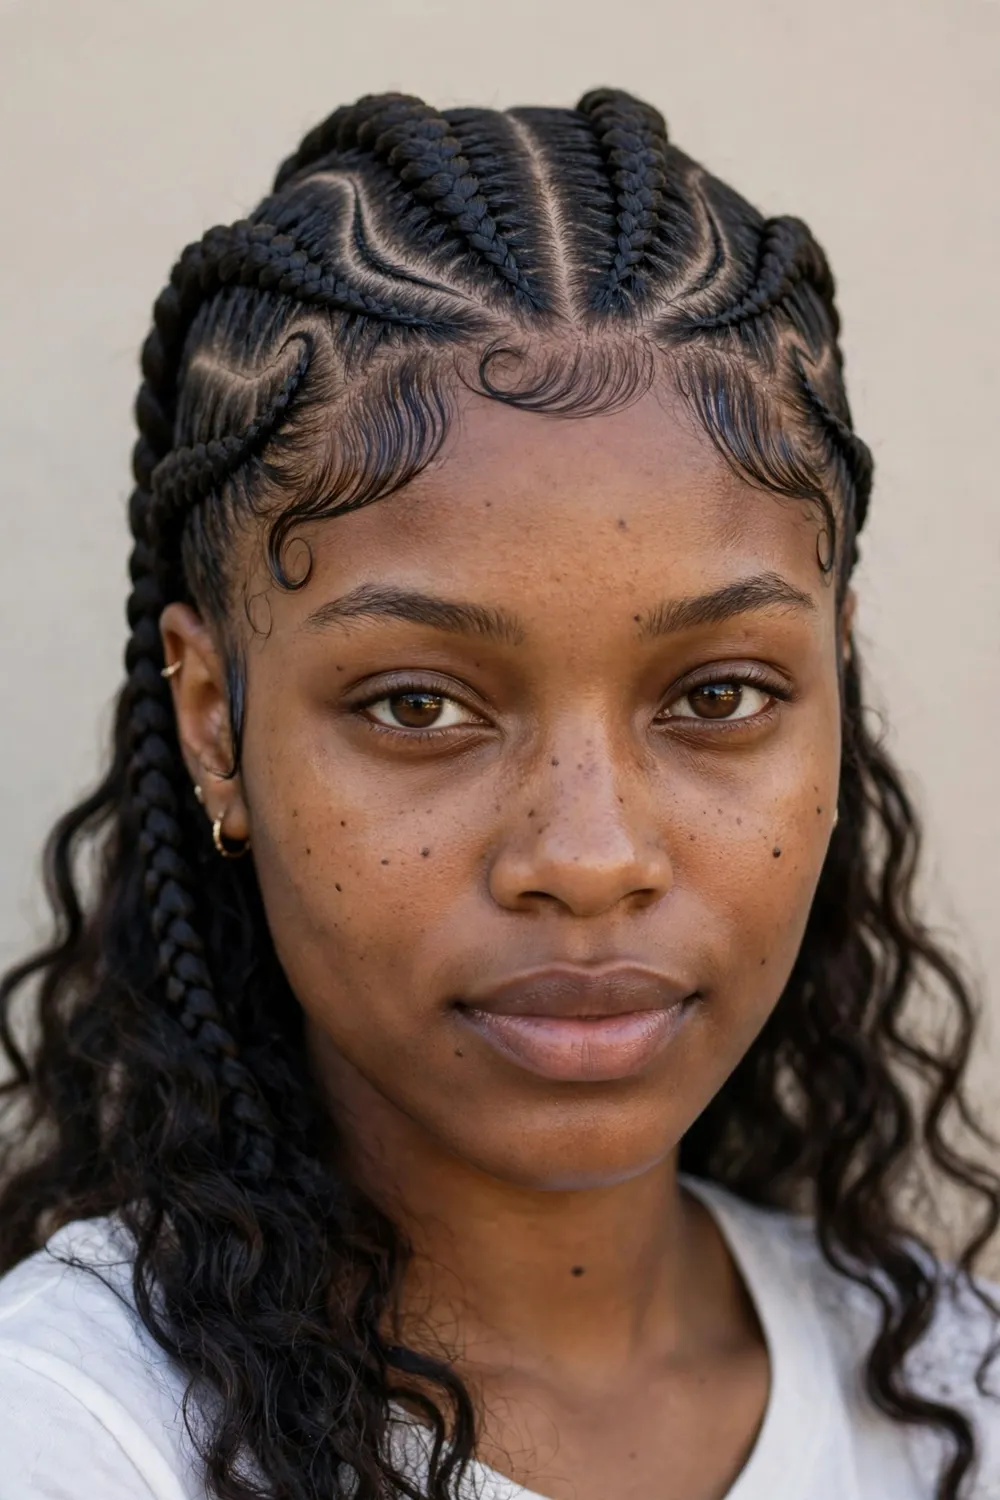
Laid edges are the finishing touch that pulls a goddess braid style together — sleek, swooped baby hairs framing the face. Ask your braider to finish the style with edge control, swooping the baby hairs into soft curves along the hairline with a small brush or an old toothbrush. The key is a light hand: a pea-sized amount of edge control, not a thick layer that flakes by lunchtime. For extra hold, tie a silk scarf around the edges for ten minutes while they set. This finish works on any goddess braid variation and suits every face shape. Just go easy on the tension — your edges are the most fragile hair on your head, and no style is worth thinning them out. Reapply lightly each morning rather than piling product on.
24. Goddess Braids with Floral Accents
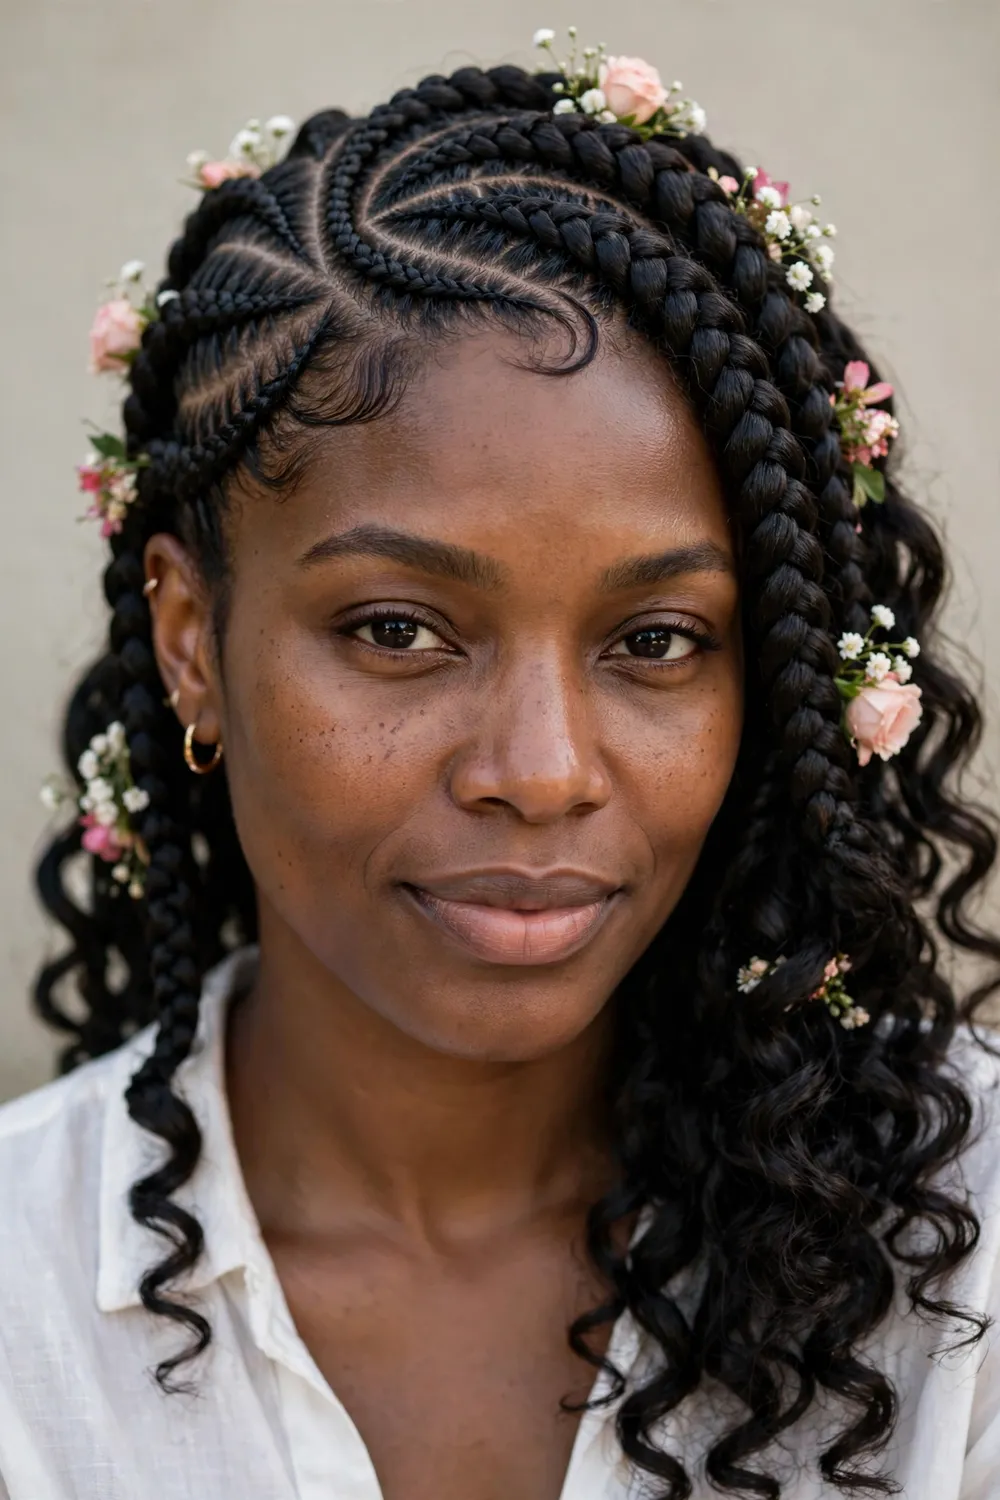
Fresh or faux flowers tucked into goddess braids turn a protective style into a statement, and it is a favourite for weddings, photoshoots and summer parties. Ask your braider to leave a few small gaps or loops in the braiding where flowers can be pinned, or simply tuck the stems in afterwards and secure them with small pins. Faux flowers are the practical choice: they will not wilt in the heat and you can reuse them. If you use fresh ones, add them on the day of the event, not the day before. A light-hold hairspray keeps everything in place without stiffening the curls. This style suits anyone who wants a soft, romantic finish, and it looks wonderful in photos.
25. Knotless Goddess Braids
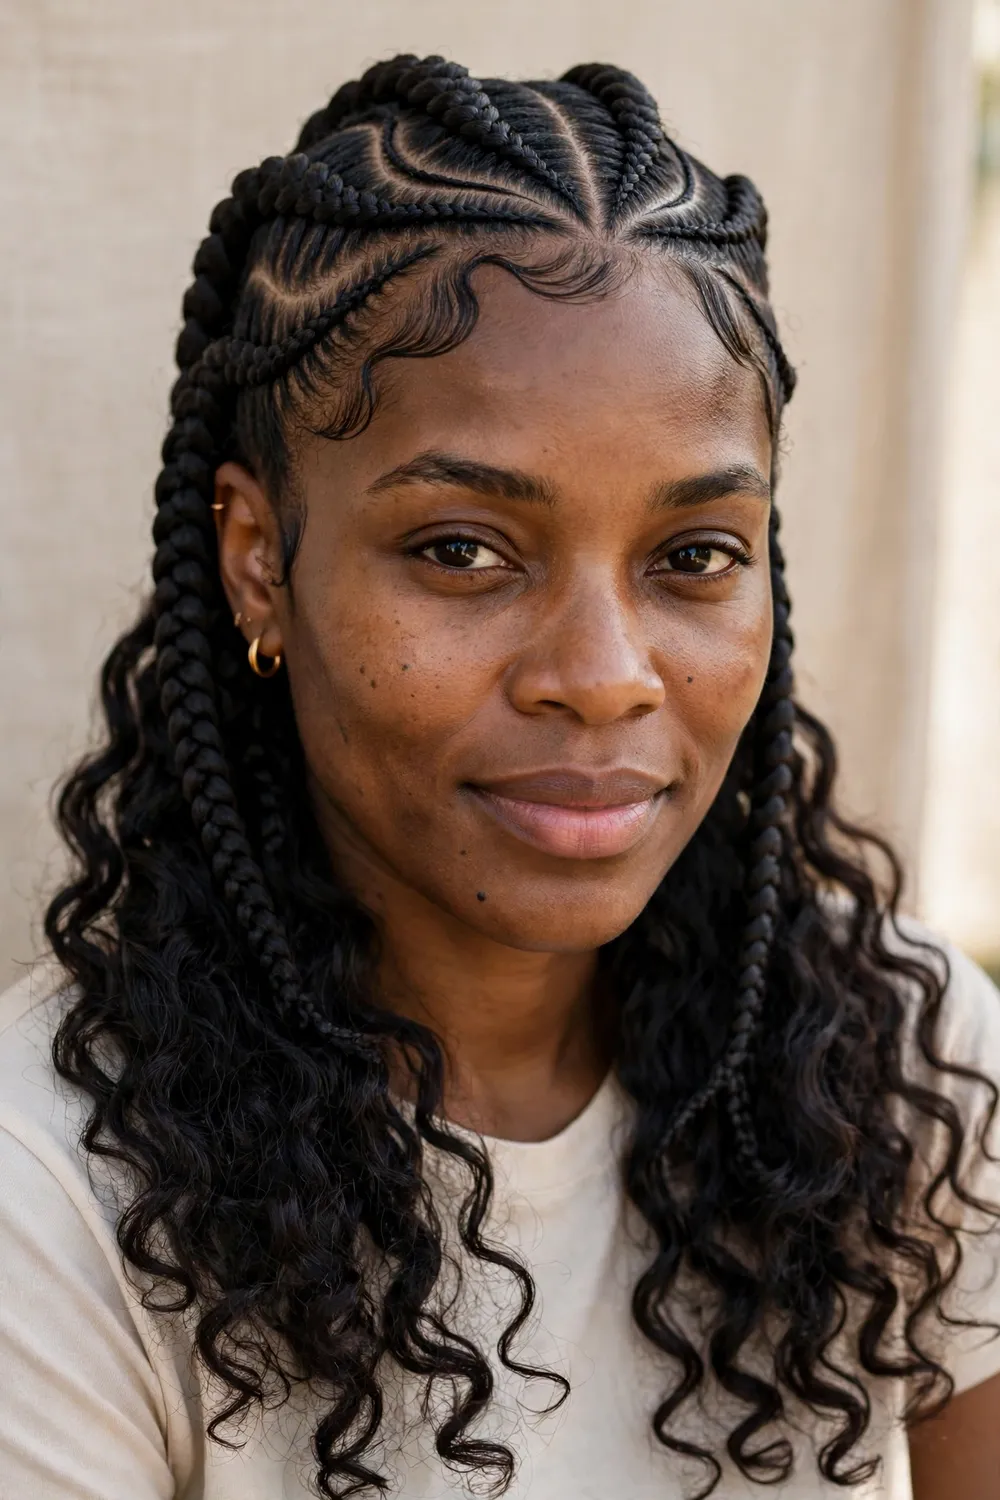
Knotless goddess braids start each cornrow with your own hair, feeding the extensions in gradually, so there is no knot and no pulling at the hairline. If tight braids have ever left you with a headache or sore edges, this is the version to ask for. Tell your braider you want a knotless feed-in start, with the extensions added a few stitches in, and the same curved partings and curly ends as the classic style. It can cost a little more and take slightly longer, because the technique needs a skilled hand, but the comfort is worth it. Maintenance is the same as regular goddess braids, and the grow-out looks softer too, since there is no knot to highlight the new growth. A genuinely tension-free option.
26. Goddess Stitch Braids

Goddess stitch braids use the stitch-feed technique, where the braider adds tiny, even amounts of hair with each stitch, creating razor-sharp lines between the cornrows. The finish is so neat it almost looks drawn on. This is the style to show your braider if you love precision and clean partings. Ask for stitch-feed cornrows with a curved or straight-back pattern, and specify how many rows you want — six to eight is a good middle ground. The payoff is a style that looks freshly done for weeks. Keep the lines crisp by oiling the scalp lightly and sleeping in a silk bonnet; heavy products will blur the sharpness you paid for.
27. Goddess Braids Bob
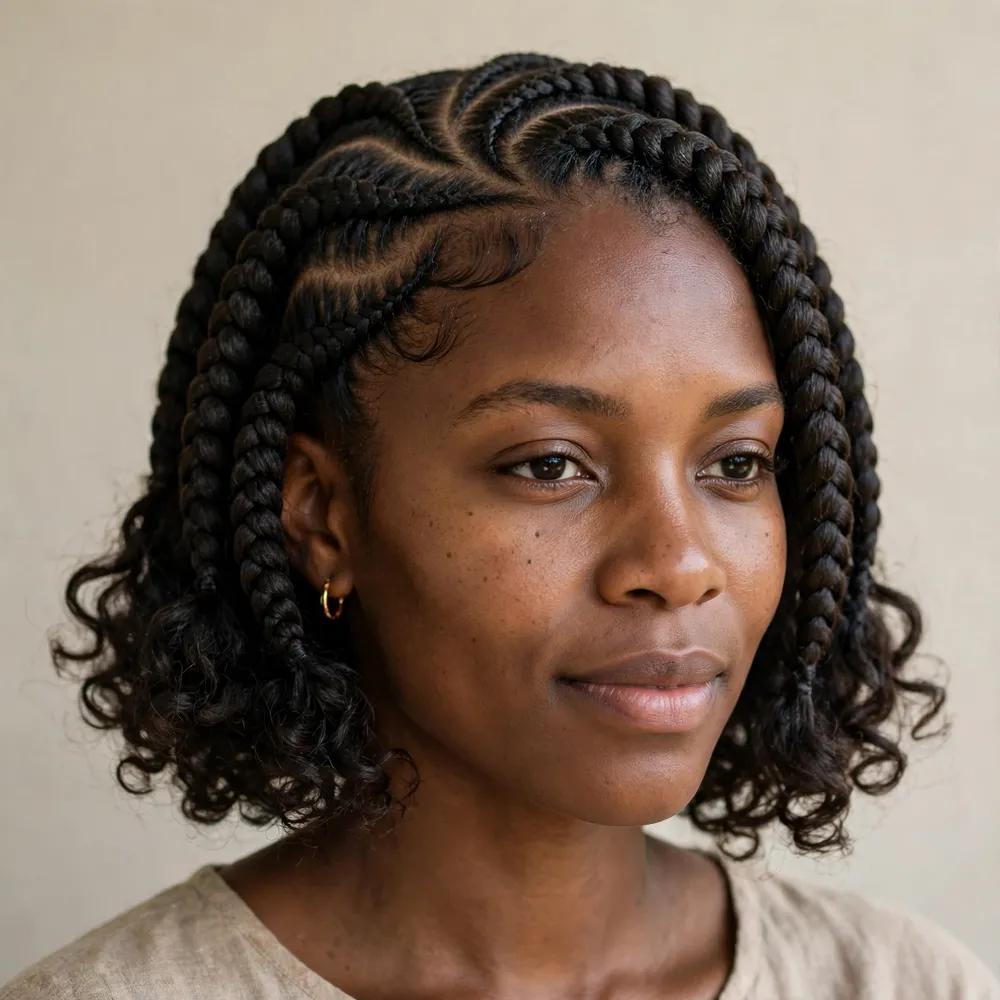
The goddess braids bob takes the regal cornrow look and cuts it to chin length, with curly ends that bounce around the jawline. It is light, easy to wear and perfect for hot weather, when waist-length braids feel like a blanket. Ask your braider for cornrows braided to chin length, finished with curls that flick out slightly at the ends. A little mousse keeps the curls springy, and the bob shape frames the face beautifully, especially on round and heart-shaped faces. It is also a great choice if you are trying goddess braids for the first time and do not want the commitment of long hair. Refresh the curls with water and a dab of cream each morning.
28. Ombre Goddess Braids
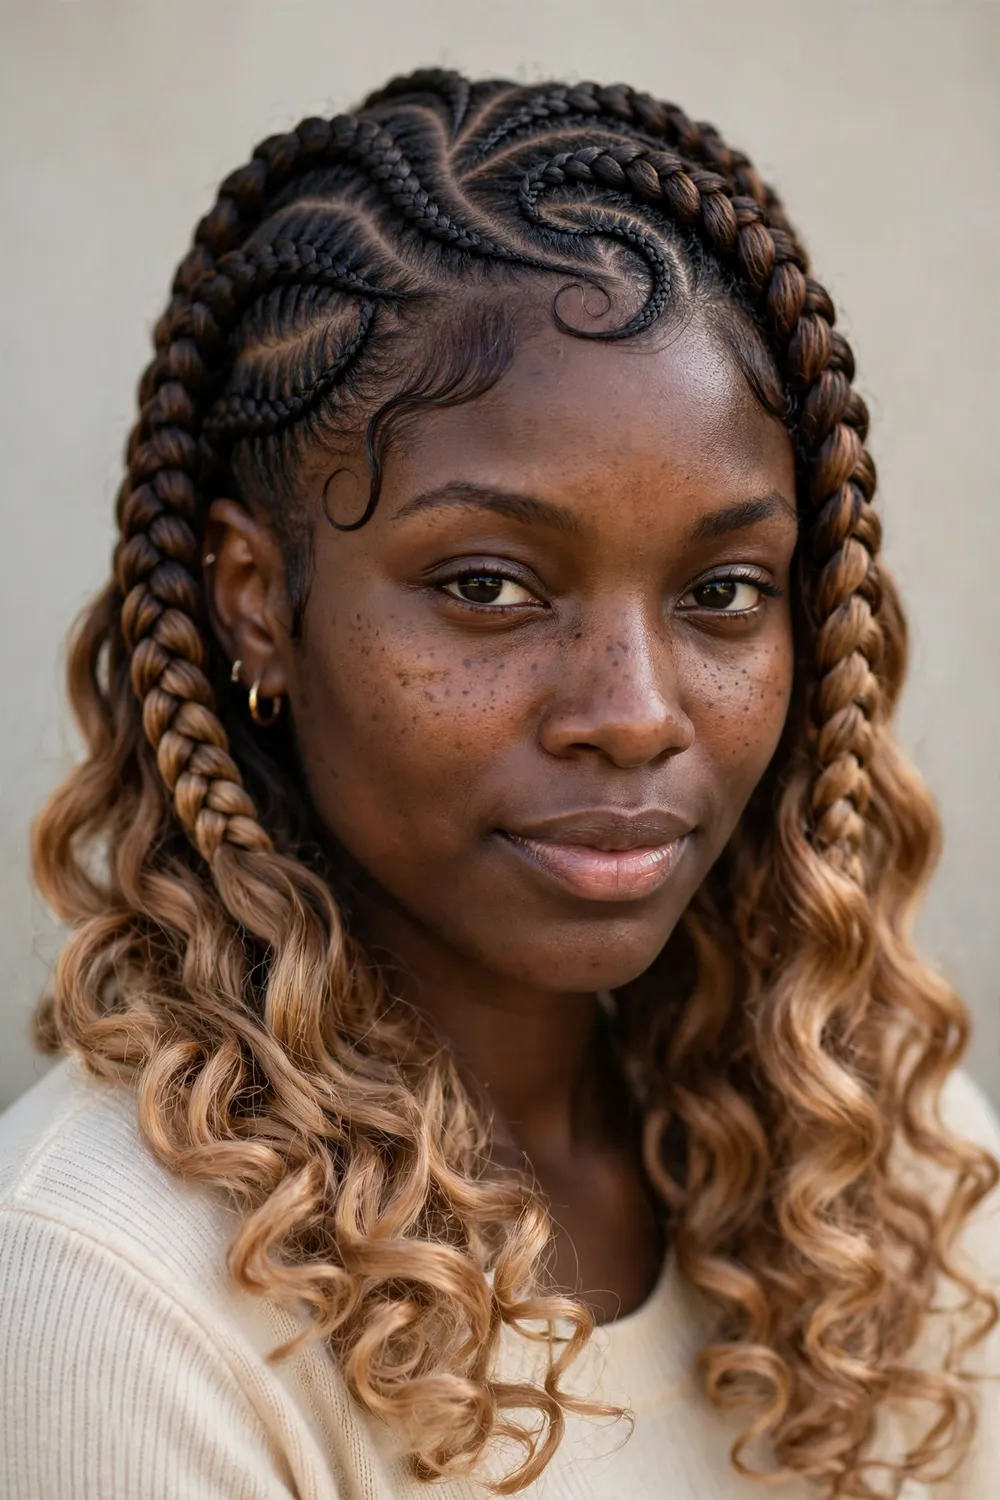
Ombre goddess braids use braiding hair that fades from dark roots to lighter ends, giving the style a soft gradient that catches the light as you move. It is colour without the commitment — no bleach on your own hair, no grow-out line to worry about. Ask your braider for ombre braiding hair in your chosen shades; dark brown fading to honey blonde is the most flattering starting point, but burgundy to copper works beautifully too. A light oil sheen brings out the colour shift, and the curly ends show the lightest shade off nicely. Maintenance is simple, since the colour is in the extensions, not your hair. If you have never tried colour before, this is the lowest-risk way to find out whether lighter ends suit you.
29. Blonde Goddess Braids

Full blonde goddess braids — honey, golden or platinum — are a bright, head-turning look that changes your whole appearance. Ask your braider for blonde braiding hair in a shade that flatters your skin; honey blonde is the safest bet, while platinum needs a confident stylist and regular toning of the curly ends. The curly ends are usually synthetic, so they will not need toner the way real hair would, but a purple shampoo on any human-hair curls keeps brassiness away. Be honest about the upkeep: blonde extensions show dirt and product buildup faster, so keep products light and wash on schedule. The result is worth it — a bold, sunny style that photographs like a dream.
30. Goddess Braids for Kids
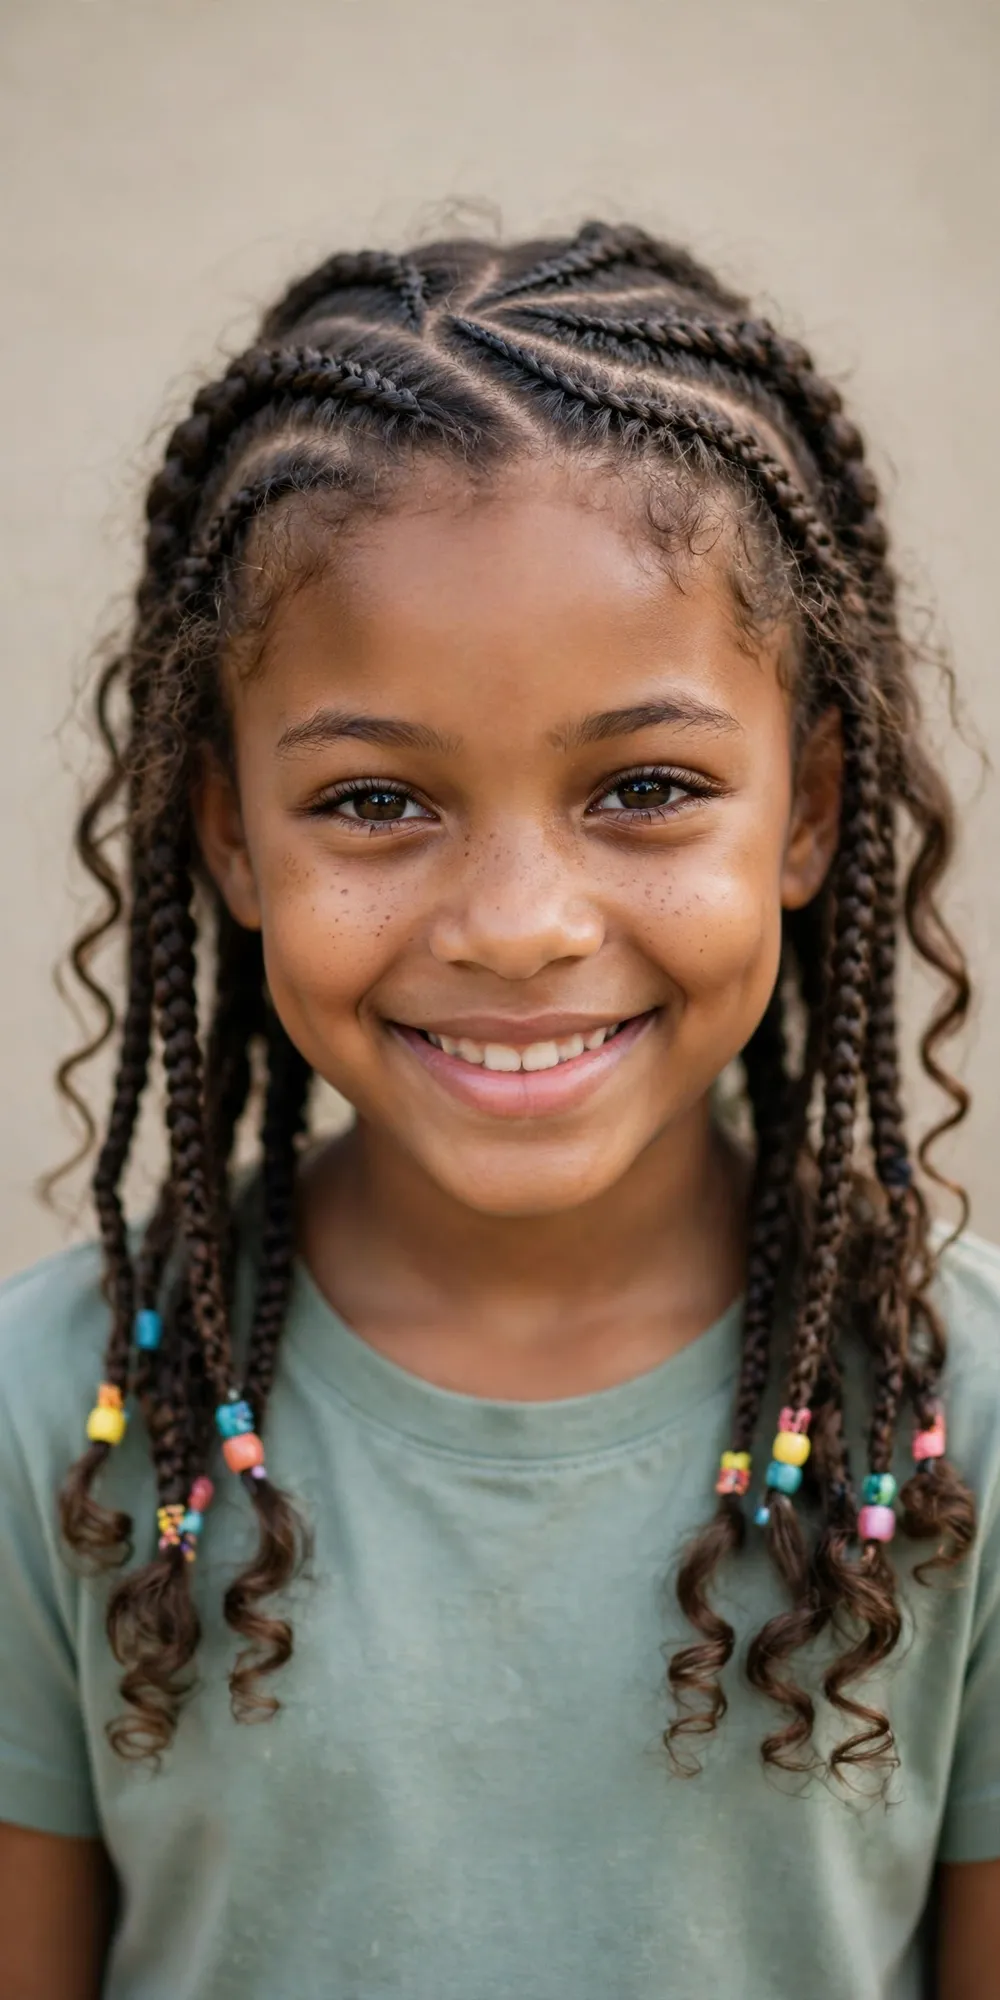
Goddess braids for kids are a gentler version of the adult style: looser cornrows, fewer rows and no tight pulling, sized for smaller heads and finer hair. Tell your braider clearly that this is for a child — the tension must be light, the edges left alone, and the appointment kept short, ideally under two hours. Jumbo or medium rows work best, finished with soft curls rather than heavy beads that can tug. Let your child pick the beads or cuffs; they will love the style more if they chose the extras. Keep the scalp moisturised with a light oil, and take the braids out after three to four weeks at most. Never let a braider pull a child’s hair tight — comfort comes first, always.
31. Goddess Braids Mohawk Updo
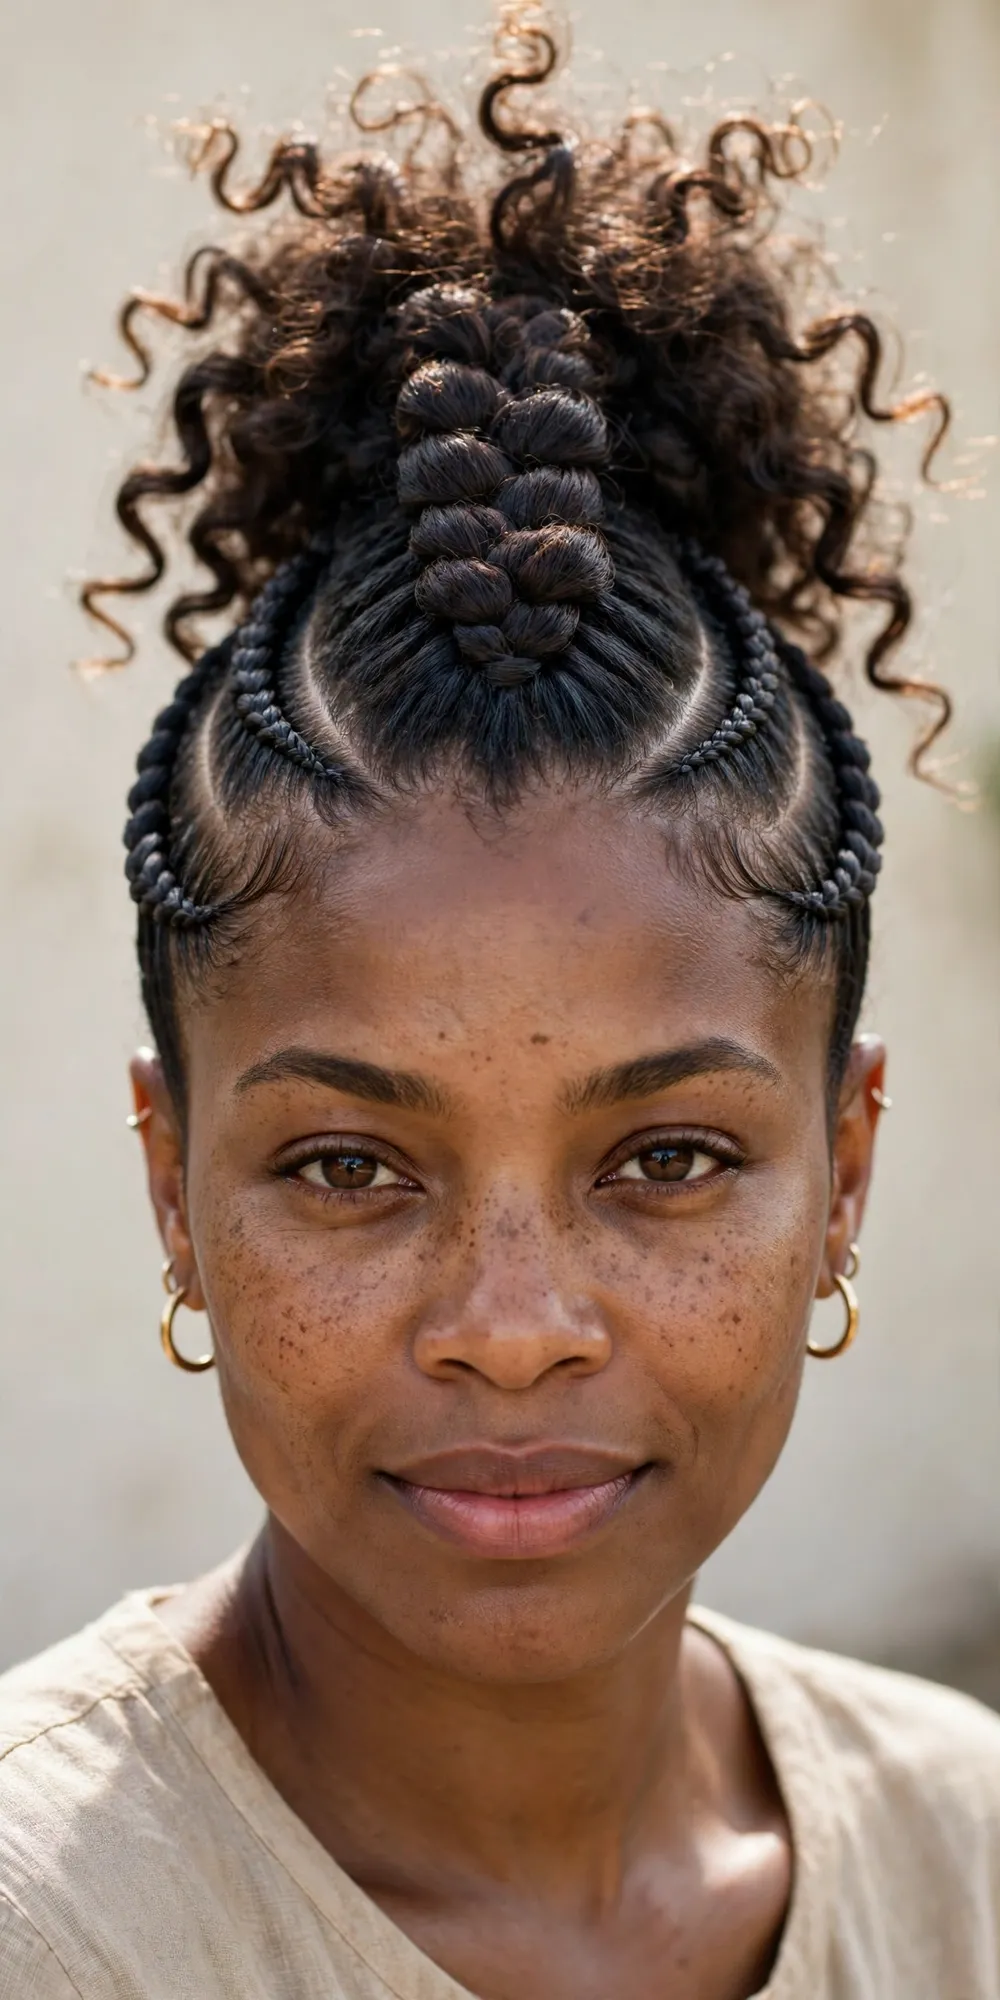
The goddess braids mohawk updo sweeps the cornrows up into a centre ridge, giving you a bold, edgy silhouette that still reads elegant. It is the style for the person who wants to make an entrance — a party, a concert, a night out. Ask your braider for cornrows on each side braided upwards and inwards, meeting in a raised centre row, with the curly ends piled on top to form the mohawk crest. The sides should be smooth and sleek, so edge control and a silk scarf set are part of the finish. Gold cuffs along the centre row add drama. Bring a photo; this one needs a clear reference.
32. French Curl Goddess Braids
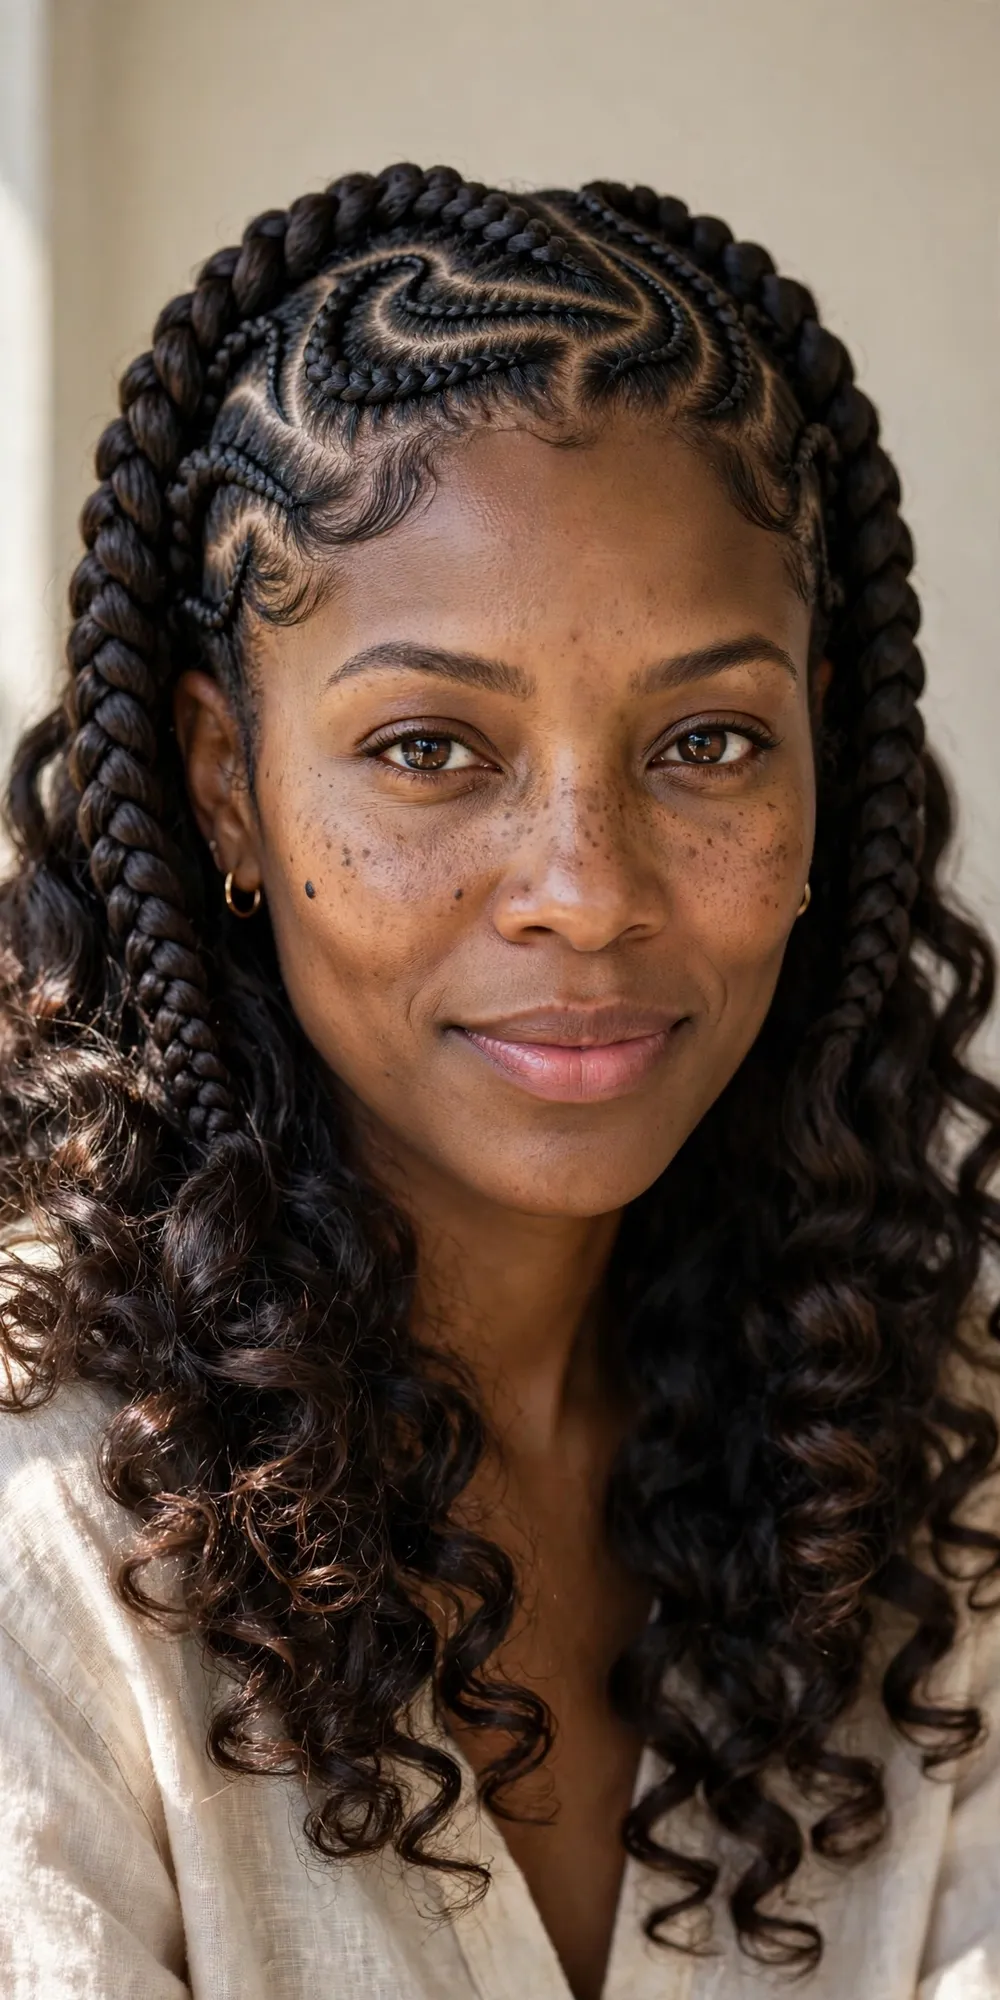
French curl goddess braids finish the cornrows with soft, loose French curls — bigger, bouncier and more romantic than the usual tight curl ends. It is the prettiest finish in this list and a favourite for weddings and date nights. Ask your braider for French curl braiding hair, with the curls left long and full rather than trimmed short. The curls need a little care to stay looking their best: separate them gently with your fingers, never a brush, and refresh them with a light curl cream or a spritz of water. Sleeping in a loose pineapple under a silk bonnet keeps the curl pattern intact. The style suits all face shapes, and the soft curls balance strong jawlines beautifully.
How to Ask Your Braider for Goddess Braids
Walking in with a clear brief is the difference between loving your braids and wishing you had said something sooner. Start with the style name and a photo — save two or three pictures of the exact look you want, from the front and the side, and show them before the braider picks up a comb. Then specify the details: how many rows you want, whether the partings should be straight, curved or zigzag, and what kind of curl you want at the ends — tight curls, loose waves or French curls. Say how long you want them, too: shoulder length is the easiest to live with, waist length is the drama option.
Before they start, ask the questions that matter. How tight will the braids be, and can they keep the hairline gentle? What type of braiding hair will they use, and where do the curls come from — are they pre-curled synthetic hair, or human hair curled with a rod? If you have sensitive skin or a tender scalp, say so now, not halfway through. Agree on the price and the time before the first braid goes in. A good braider will welcome the questions — it tells them you care about the result, and it gives them exactly what they need to deliver it.
Goddess Braids Aftercare
Good aftercare is what turns a four-week style into a six-week one. Start with the scalp: a light oil, like jojoba or a dedicated braid spray, two or three times a week keeps it comfortable without buildup. Avoid heavy butters and thick creams on the scalp — they sit on the braids, attract dust and are hard to wash out. If your scalp itches, a diluted apple cider vinegar rinse or a scalp-soothing spray helps, but do not scratch through the braids with anything sharp.
At night, always protect the style. A silk scarf or bonnet is non-negotiable — cotton pillowcases create friction, frizz the curls and rough up the edges overnight. Gather the braids loosely into a low ponytail or pile them on top of your head before you put the bonnet on. Washing takes a little care: dilute your shampoo, apply it to the scalp with your fingertips, and let the suds run down the braids rather than scrubbing the lengths. Rinse thoroughly, then pat the curls dry with a microfibre towel and let them air-dry fully before bed. Never sleep on wet braids — dampness trapped overnight invites odour and frizz.
5 Mistakes to Avoid with Goddess Braids
- Getting them braided too tight. Pain is not part of the process. Braids that pull at your hairline can cause traction alopecia — thinning and even permanent loss around the edges. If it hurts, speak up immediately, and never let a braider tell you the pain will “settle in a few days.” It will not, and your edges are not worth any style.
- Leaving them in too long. Goddess braids look good for a long time, which makes it tempting to push past six weeks. Do not. Old braids matt at the roots, the new growth tangles, and taking them out becomes a painful, hours-long job that can snap hair. Four to six weeks is the limit.
- Skipping scalp care. A protected style still needs a looked-after scalp. Dry, itchy skin under braids leads to flaking, irritation and breakage at the roots. A light oil two or three times a week takes a minute and saves you a lot of trouble.
- Sleeping without protection. Cotton pillowcases are the enemy of neat braids. One unprotected night can frizz the curls and rough up the edges; a week of them can age the style by a fortnight. A silk scarf or bonnet costs very little and makes the biggest difference of any aftercare habit.
- Using heavy products. Thick butters, heavy gels and too much edge control build up on the braids, dull the shine and attract lint. Stick to light oils, a braid spray and a small amount of mousse. If you love exploring related protective styles, our guides to cornrow hairstyles, Fulani braids and natural hairstyles for Black women cover more options in the same family.
Frequently Asked Questions
What is the difference between goddess braids and boho braids?
Goddess braids are large, sculpted feed-in cornrows — braided flat against the scalp in curved partings, finished with loose curls. Boho braids are knotless box braids with curly strands left out throughout. The base is completely different: cornrows versus individual boxed sections. Goddess braids sit flatter, show off the parting pattern and feel lighter on the scalp, while boho braids give more volume and movement.
How long do goddess braids last?
With good care, goddess braids last four to six weeks. Mini braids can stretch to six weeks because the small sections hold their shape longer, while jumbo braids may start looking loose after three to four weeks. Nightly protection with a silk bonnet, light scalp oiling and not over-washing are what get you to the longer end of that range. Past six weeks, take them out — the roots will start to matt and removal gets harder.
Do goddess braids damage your hair?
Done properly, goddess braids protect your hair rather than damaging it — they keep your ends tucked away and cut down on daily styling. Damage happens when the braids are installed too tight, left in too long, or taken out roughly. The rules are simple: no pain at the hairline, no more than six weeks of wear, and take them down gently, detangling each section with conditioner before you wash. If your hairline is already thinning, choose the knotless version.
How much do goddess braids cost?
In a salon, goddess braids typically cost between $100 and $300, depending on the length, the size of the braids and where you live. Waist-length or mini braids sit at the top of that range because they take longer, while a shoulder-length jumbo style is usually the cheapest. The price normally includes the braiding hair, but always confirm before you book — some salons charge extra for the curly ends or for beads and cuffs.
Can you wash goddess braids?
Yes, you can and should wash them. Wash every one to two weeks using diluted shampoo applied to the scalp with your fingertips, letting the suds run down the braids without scrubbing the lengths. Rinse thoroughly and let the braids air-dry completely before bed — never sleep on wet braids. A dry shampoo or scalp spray between washes keeps things fresh without soaking the curls.
How long does it take to install goddess braids?
A standard set takes about three to five hours. Jumbo braids can be done in two to three hours, while mini braids or waist-length styles can take five to six hours. The time depends on the number of rows, the length and your braider’s speed. Book a morning appointment for longer styles, and ask for a time estimate when you book so you can plan your day.
Are goddess braids good for thin or fine hair?
Yes, with the right approach. The knotless version is the best choice for thin or fine hair, since it starts with your own hair and adds extensions gradually, so there is no heavy knot pulling at the hairline. Ask for medium or jumbo rows rather than mini ones, keep the braids shoulder length or shorter to reduce weight, and make sure the tension stays gentle. Avoid heavy beads or thick cuffs, which can drag fine hair down.
Final Word
Goddess braids are one of those rare styles that manage to be protective, practical and genuinely regal all at once — and with 32 variations to choose from, there is a version for every face, every occasion and every comfort level. Pick your favourite, save the photo, and show your braider exactly what you want. If you are still browsing for your next look, you will find plenty more ideas on the blog.